¶ Argon ONE UP CM5 Laptop — Resource Page
Open-source Raspberry Pi laptop designed for Builders, Developers, and Educators.
The Argon ONE UP Laptop brings desktop-grade Raspberry Pi performance into a portable, mobile, and upgrade-friendly form factor. Built around the Argon ONE Design Ecosystem, it emphasizes modularity, serviceability, and community-driven development.
We want you to assemble, customize, and iterate with confidence.
¶ Overview
The Argon ONE UP CM5 Laptop is a fully assembled, open-design laptop chassis built around the Raspberry Pi Compute Module 5 (CM5). Unlike consumer laptops, it is designed to be opened, modified, and extended — with a user-serviceable internal layout, a native 40-PIN GPIO expansion interface, and support for M.2 NVMe storage.
It is aimed at:
- Makers and tinkerers building custom Raspberry Pi systems
- Developers needing a portable Linux workstation
- Educators and students learning hardware–software integration
- Open-source enthusiasts extending the Argon 40 ecosystem
¶ Key Highlights
- Raspberry Pi–powered portable and truly mobile workstation
- Modular and serviceable internal design
- Fully integrated display, keyboard, and trackpad
- Designed for sustained performance with proper thermal management
- Optimized for open-source software and maker workflows
¶ What's in the Box
| Item | Description |
|---|---|
| 1 | Argon ONE UP CM5 Laptop chassis (CNC aluminum) |
| 2 | Argon THRML cover plate with integrated cooling |
| 3 | Thermal pads (1 mm, pre-cut) |
| 4 | Antenna wire (pre-routed) |
| 5 | Mounting screws |
| 6 | Quick-start guide |
📝 Note: The Raspberry Pi CM5 module and M.2 NVMe SSD are not included and must be purchased separately.
¶ Parts and Features
Fig 1: Argon ONE UP Parts — Front View
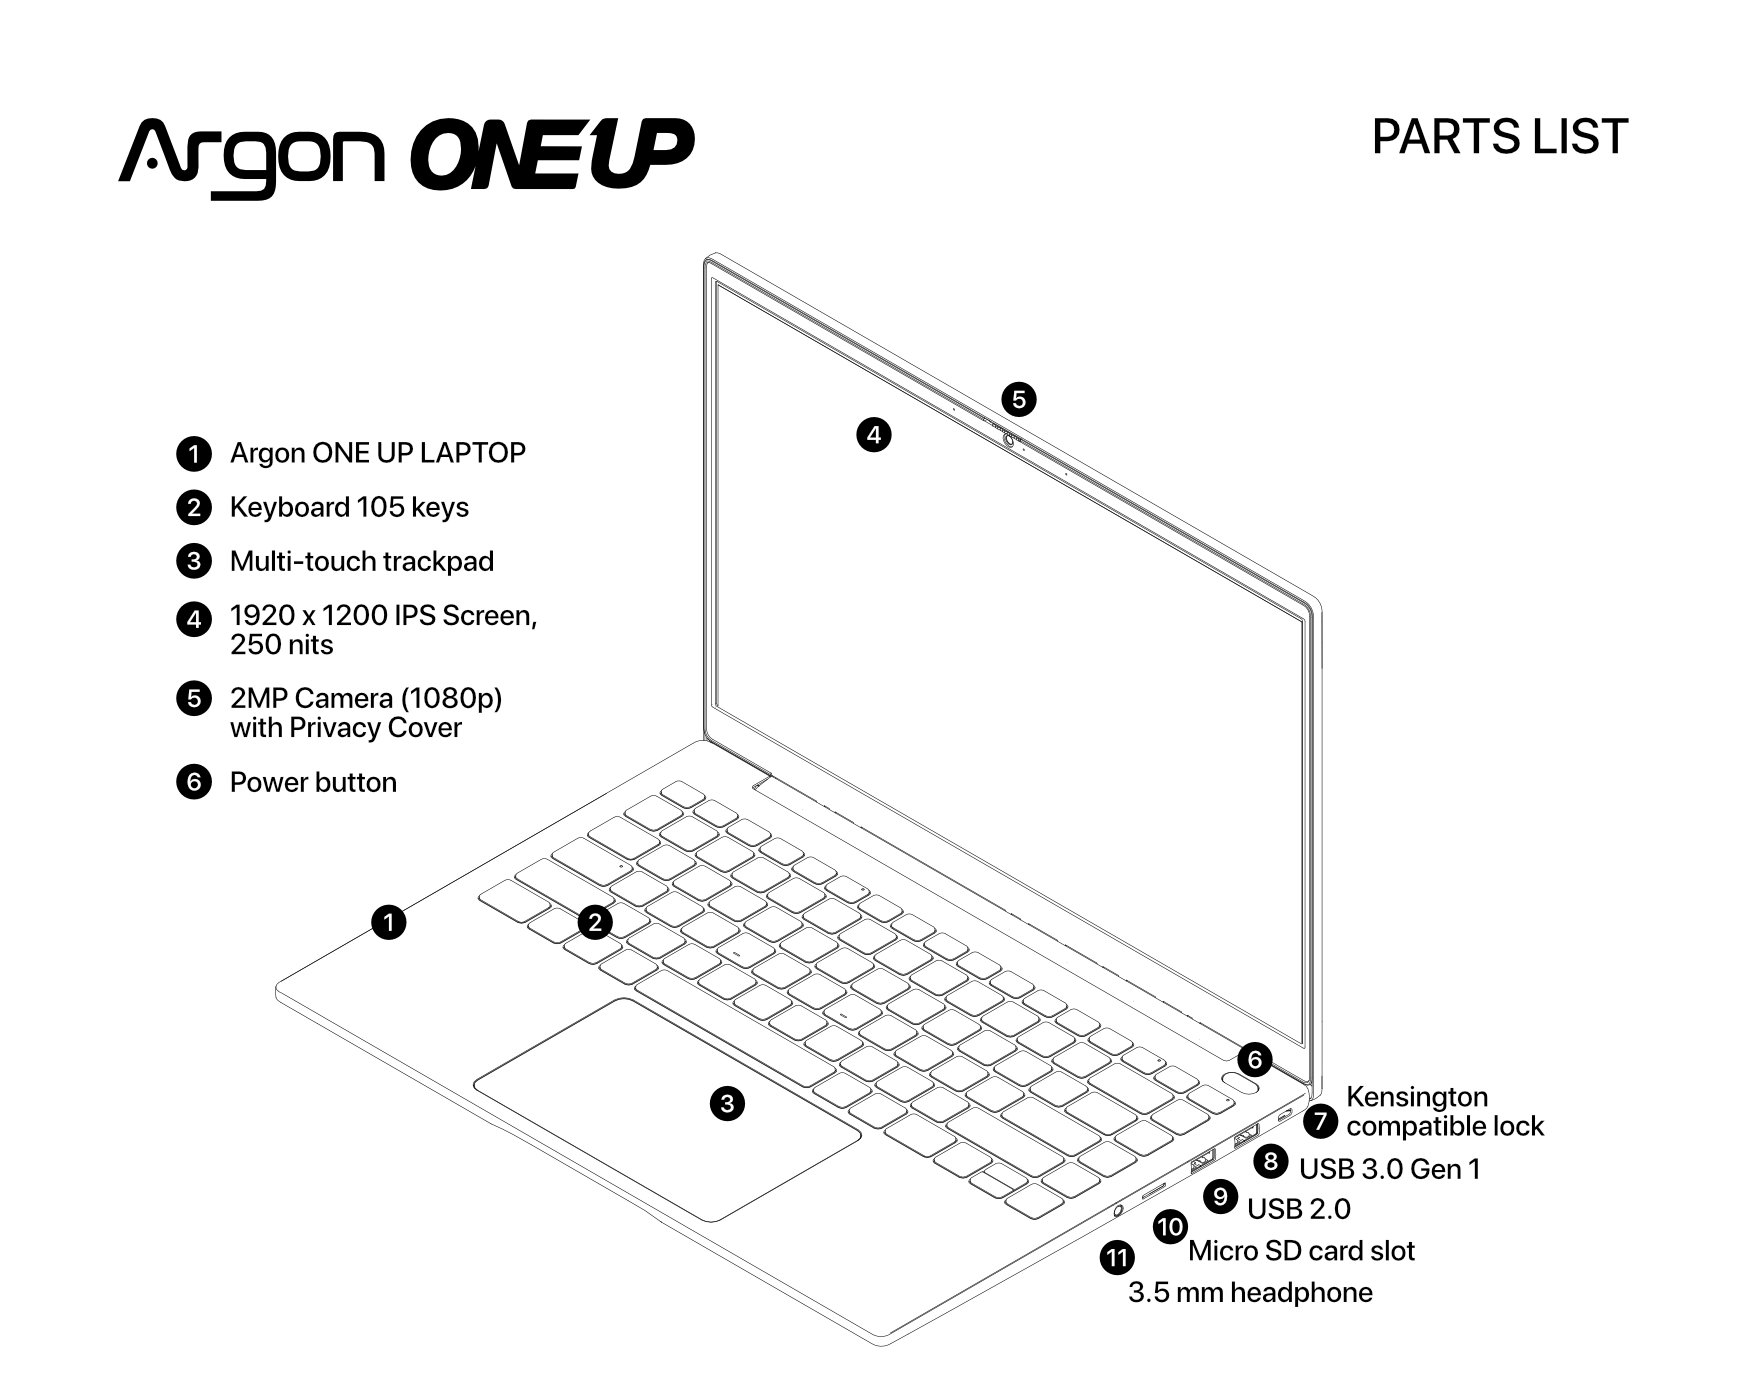
Fig 2: Bottom View
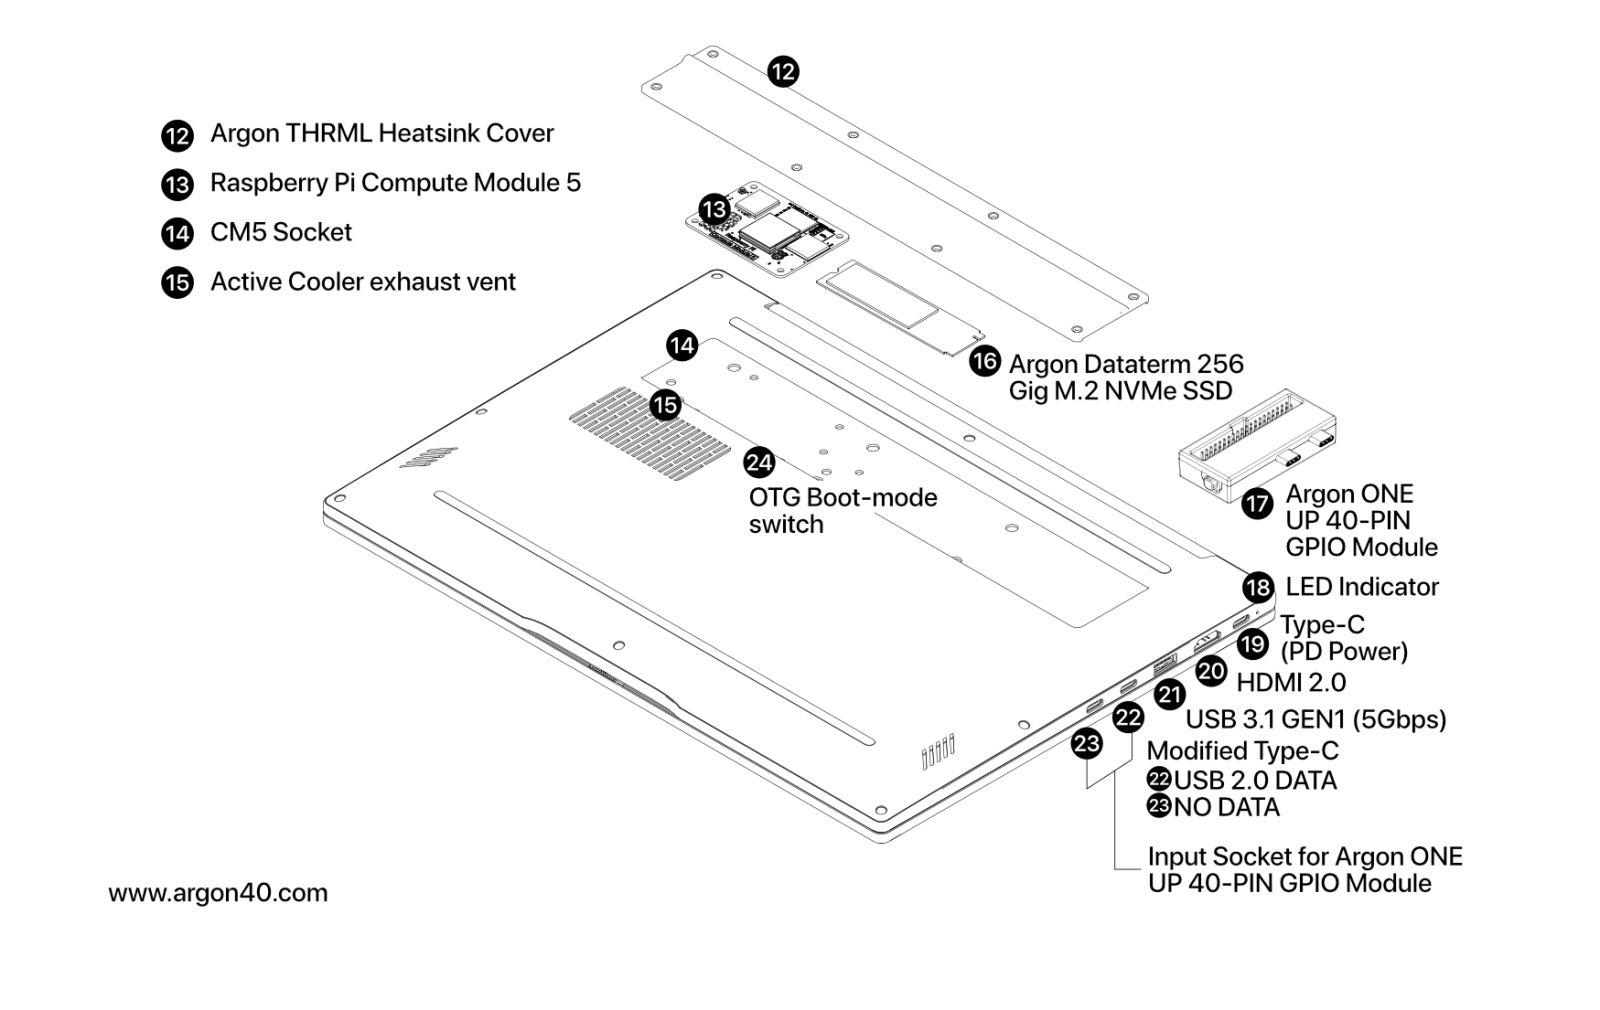
¶ Specifications
| Category | Item No. | Specification |
|---|---|---|
| Compute Platform | 13 | Raspberry Pi CM5 (all supported configurations) |
| Processor | 13 | Broadcom BCM2712, Quad-core Arm Cortex-A76 |
| Memory | 13 | 8 GB or 16 GB LPDDR4X (depending on CM5 variant) |
| Display | 4 | 14-inch IPS LCD, Full HD (1920 × 1080) |
| Keyboard | 2 | Full-size, 105-key layout |
| Pointing Device | 3 | Integrated multi-touch trackpad |
| Wireless | 13 | Dual-band Wi-Fi + Bluetooth (via CM5 module) |
| Ports | 8 | USB Type-A — USB 3.0 Gen 1 |
| 9 | USB Type-A — USB 2.0 | |
| 20 | HDMI Out 2.0 | |
| 21 | USB Type-A — USB 3.1 Gen 1 | |
| 22 | USB Type-C — USB 2.0 (modified, for 40-PIN GPIO Module) | |
| 23 | USB Type-C — No data (modified, for 40-PIN GPIO Module) | |
| 19 | USB Type-C — Power input (PD, normal mode) / OTG data (boot mode) | |
| Boot Options | 13 | Via CM5 eMMC (on supported CM5 variants) |
| 16 | Via internal M.2 NVMe SSD | |
| 10 | Via microSD card (CM5 without eMMC only) | |
| 8, 9, 21 | Via USB — USB Type-A ports only | |
| CM5 Boot Mode | 24 | OTG boot mode switch (set to OTG to enter boot mode) |
| 19 | OTG data access port when in boot mode | |
| Storage | 10 | microSD card slot — boot use only on CM5 without eMMC |
| 16 | M.2 NVMe SSD — M-Key, 2242 / 2260 / 2280, PCIe Gen 2 × 1 | |
| 13 | eMMC (via CM5 module, variant-dependent) | |
| Camera | 5 | USB camera with microphone, 2 MP |
| Audio | 11 | 3.5 mm audio jack |
| — | Integrated stereo speakers | |
| Power Input | 19 | USB-C PD charging, minimum 45 W |
| — | Internal rechargeable battery, 55 Wh | |
| Cooling | 12 | Argon THRML passive + active cooling system |
| Chassis | 1 | CNC aluminum enclosure |
| Operating Systems | — | Raspberry Pi OS, Ubuntu, other Debian-based distributions |
¶ Dual-Use Port Notes
- Port 19 serves two roles: it is the USB-C PD power input during normal operation, and the OTG data transfer port when the OTG boot mode switch is set to OTG.
- Ports 22 and 23 are custom-modified USB-C connectors designed for the Argon ONE UP 40-PIN GPIO Module. Port 22 retains USB 2.0 data functionality; Port 23 carries no USB data.
⚠️ Warning: Do not attempt to use ports 22 or 23 as standard USB-C charging or display outputs. They are electrically modified and not compatible with standard USB-C devices or cables in that role.
¶ ONE UP Main Board Block Diagram
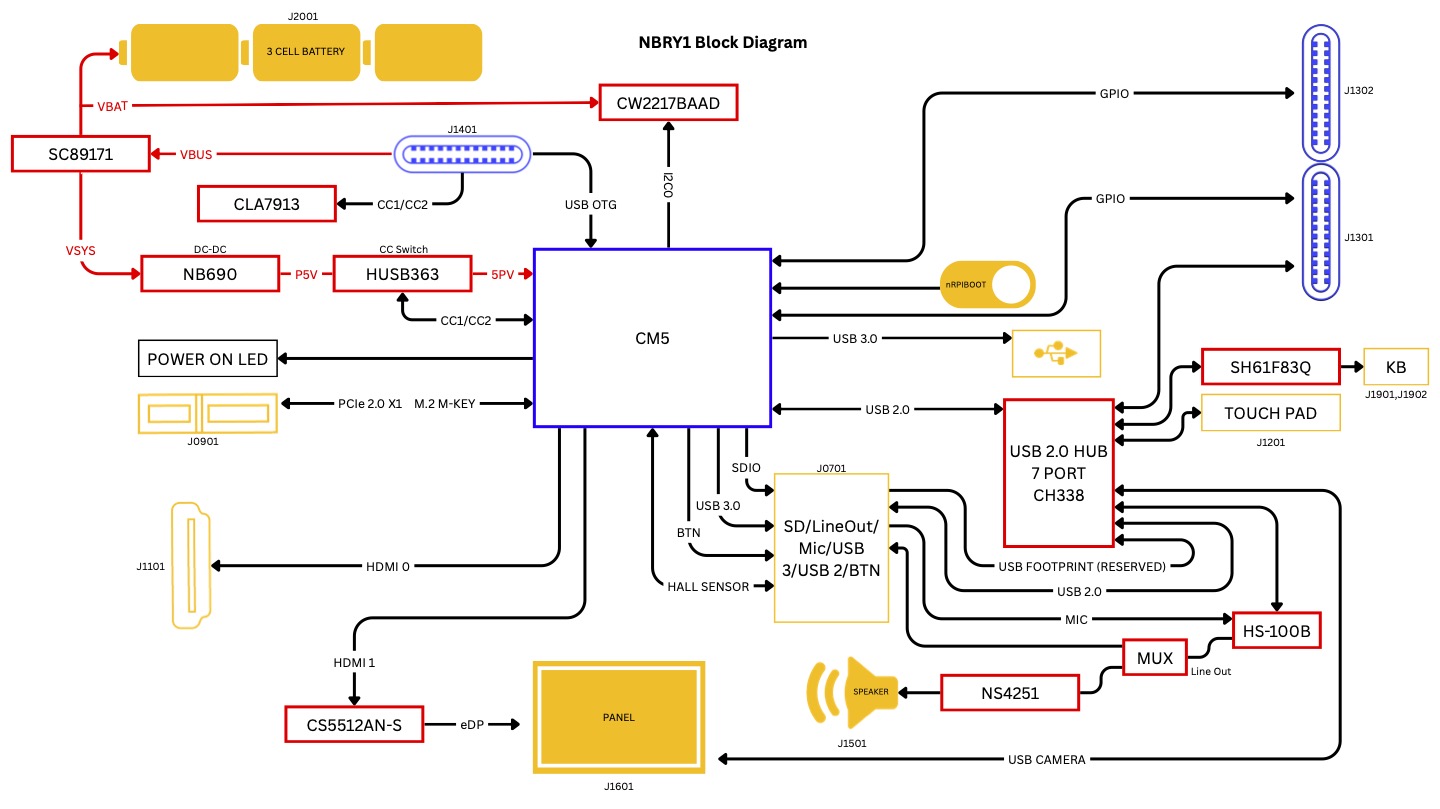
Fig 3: Block Diagram
¶ Board Architecture
¶ Power Management
- Power is supplied via the USB Type-C port on the upper-left side of the device (Item 19).
- The SC89171 power management IC handles battery charging and regulates power delivery to both the CM5 and all ONE UP peripherals.
- This design ensures the CM5 consistently receives 5 V at up to 5 A for stable operation.
- The power LED indicator is driven directly by the CM5.
📝 Note: Minimum recommended charger output is 45 W. Lower-wattage chargers may result in instability under full load, especially when the battery is also charging.
¶ Display
- The C55512AN-S bridge IC converts the CM5's HDMI output signal to eDP (Embedded DisplayPort), which is the standard interface used by the integrated IPS LCD panel.
¶ Built-in Keyboard, Trackpad, USB Camera, Microphone, and Internal Speakers
- All internal peripherals — keyboard, trackpad, USB camera, microphone, and speakers — are connected to the CM5 through a 7-port USB hub (CH338R).
- The CM5's USB 2.0 interface must be enabled for these devices to function.
- In Raspberry Pi OS, USB 2.0 is enabled by default — no action required.
- In other Debian-based distributions (such as Ubuntu), USB 2.0 may be disabled and must be explicitly enabled.
📝 Note: Without this setting, the keyboard, trackpad, camera, and speakers will not be recognized at boot.
Add the following line to /boot/firmware/config.txt:
dtoverlay=dwc2,dr_mode=host
¶ Two Modified USB-C Ports (Left Side) — 40-PIN GPIO Module Interface
- The 40-PIN GPIO is the core hardware interface of any Raspberry Pi platform.
- The ONE UP 40-PIN GPIO is fully electrically compatible with the standard Raspberry Pi 40-PIN GPIO.
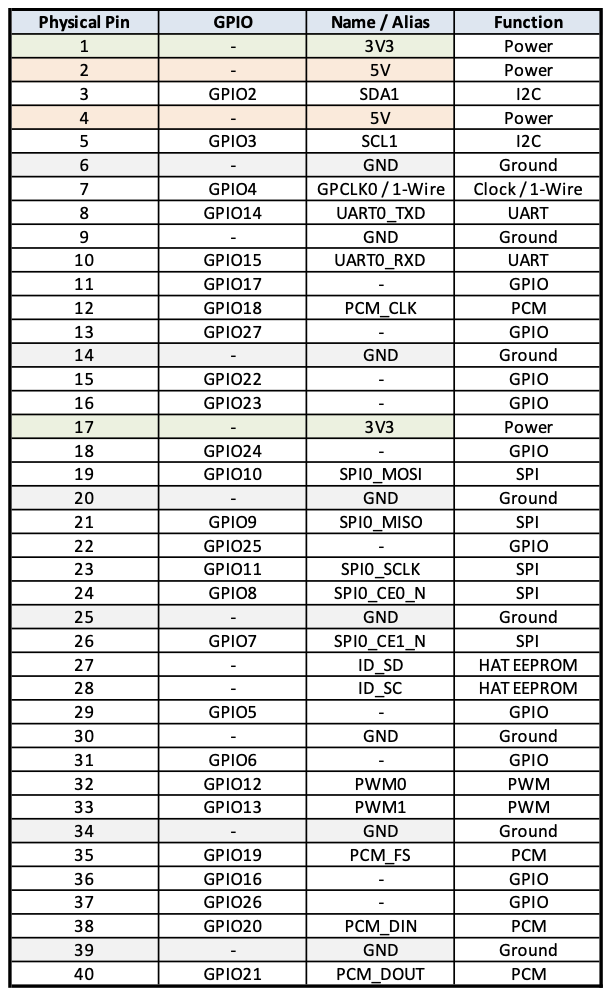
- On the Argon ONE UP, this interface is exposed through two modified USB-C connectors on the left side (Items 22 and 23), used to connect the Argon ONE UP 40-PIN GPIO Module (Item 17).
- Because these connectors are repurposed for GPIO routing:
- Port 22 retains USB 2.0 data functionality
- Port 23 carries no USB data
Fig 4: Dual USB-C to 40-PIN GPIO Conversion Map
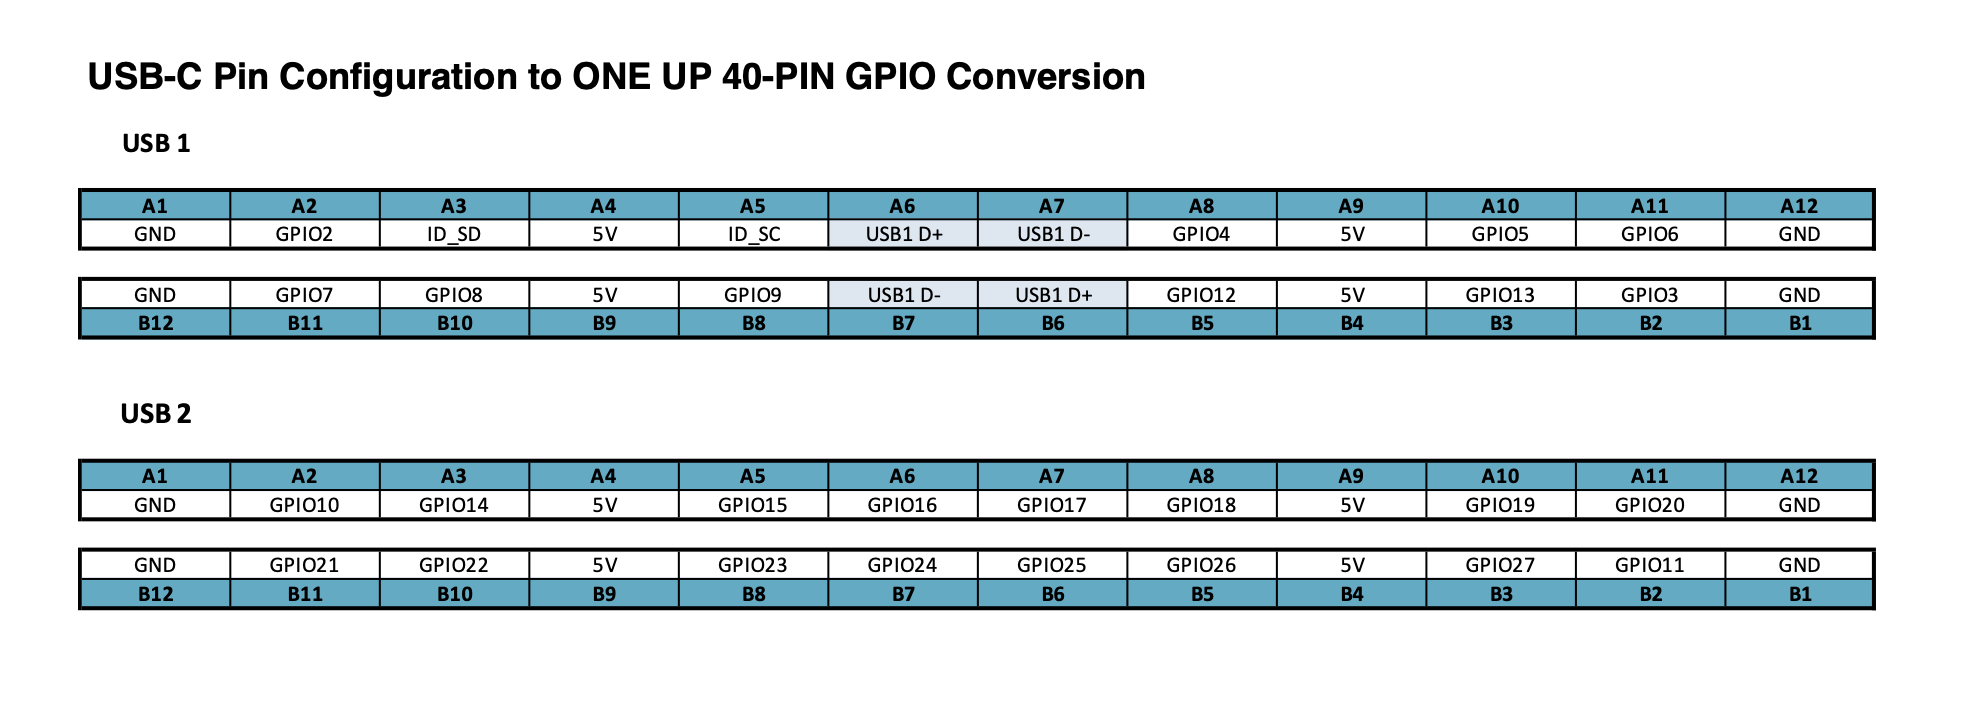
Fig 5: Raspberry Pi 40-PIN GPIO — ONE UP Module
¶ Boot Mode Access (CM5 Modules with eMMC)
- Boot Mode allows a host computer to access the CM5's eMMC storage for flashing or imaging.
- To enter boot mode:
1. Flip the OTG switch to the OTG position (Item 24)
2. Connect Item 19 (upper-left USB-C port) to your host computer using a USB-C data cable
3. Power on the laptop
⚠️ Warning: Always return the OTG switch to Normal mode after flashing. The laptop will not boot in OTG mode during regular operation.
¶ Assembly & Setup
The Argon ONE UP Laptop is designed to make hardware assembly simpler than a typical Raspberry Pi 5 Model B build.
Unlike standard Raspberry Pi builds that require independent board mounting, multiple cable connections, separate storage configuration, and individual peripheral setup, the ONE UP consolidates these into a minimal, streamlined process.
¶ What You Need to Install
For most users, hardware assembly consists of only two primary steps:
-
Install the Raspberry Pi CM5 (Compute Module 5)
The CM5 slots directly into the internal carrier board — no GPIO alignment, external adapters, or additional boards required. Connect the antenna wire to the CM5 module during this step. -
Install an M.2 NVMe SSD
Insert an M.2 NVMe SSD preloaded with your preferred Raspberry Pi 5–compatible Linux operating system (such as Raspberry Pi OS or Ubuntu).
Once these two components are installed, the core hardware assembly is complete.
¶ Notes for CM5 Variants with eMMC
If you are using a CM5 with onboard eMMC storage, additional setup is required before first boot:
- The CM5 must be placed into Boot Mode (see the Boot Mode section below)
- The operating system must be flashed onto the eMMC from a host computer
- Refer to the Setup Boot Mode and Flash Raspberry Pi OS sections for detailed steps
¶ Hardware Assembly Guide
¶ Step 1 — Verify Power Is Off
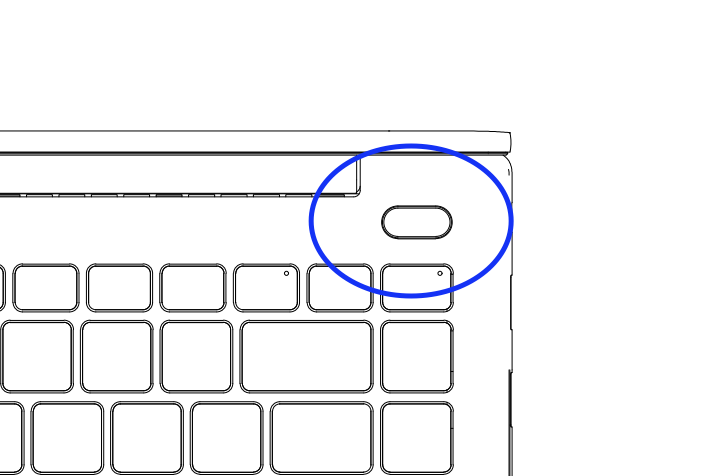
- Before beginning, confirm that the power button LED is not illuminated.
- This ensures no power is being supplied from the internal battery to the CM5 socket or internal ports.
Fig 6: Power ON Button LED
¶ Step 2 — Access Internal Components
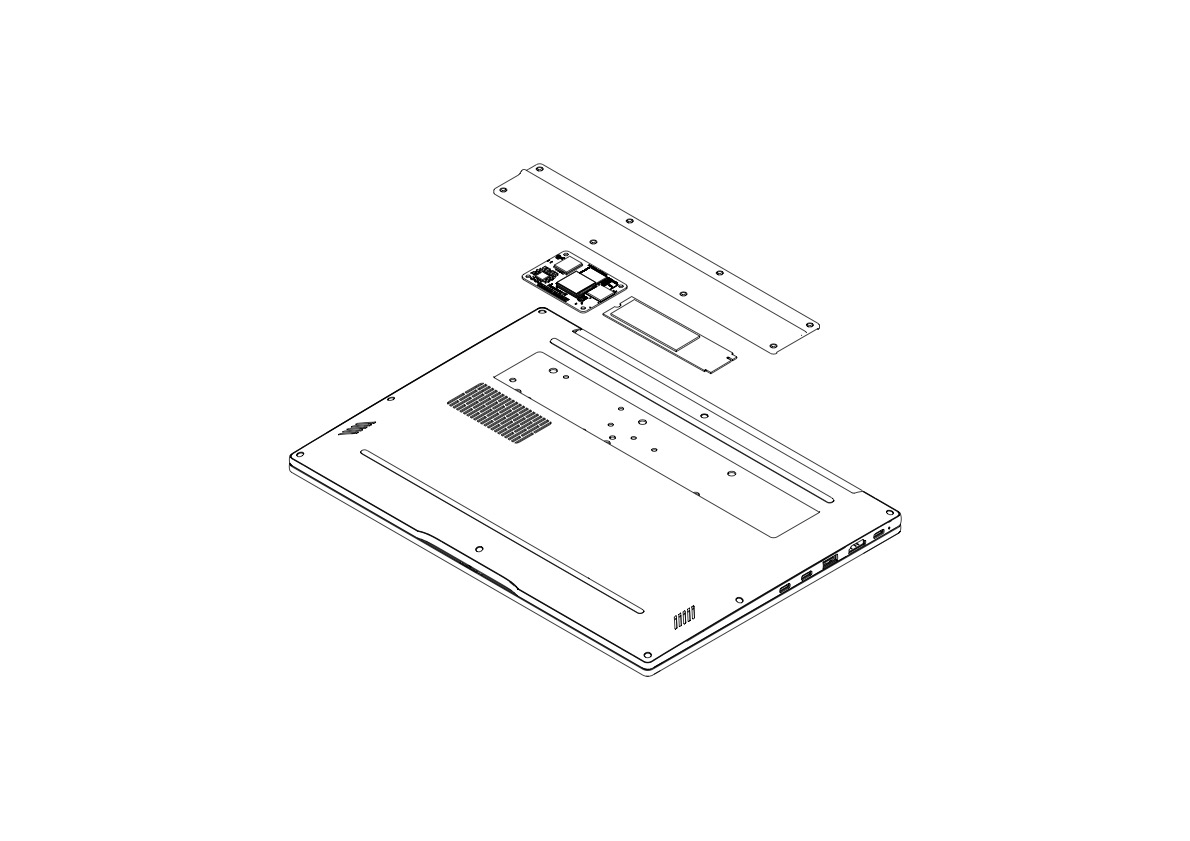
Remove all screws securing the Argon THRML plate cover and carefully lift it off.
Fig 7: THRML Cover, CM5, and M.2 NVMe — Exploded View
This exposes:
- The Raspberry Pi CM5 socket
- The PCIe M.2 (NVMe) slot
At this stage, install either:
- An M.2 NVMe SSD for primary storage, or
- A Hailo AI M.2 module, if your CM5 variant includes onboard eMMC storage
📝 Note: The M.2 slot uses PCIe Gen 2 × 1. NVMe drives in the M-Key form factor at lengths 2242, 2260, or 2280 are all compatible.
¶ Step 3 — Install the Raspberry Pi CM5 Module
⚠️ Warning: The CM5 is a precision component. Handle it carefully and avoid bending the board or applying uneven force.
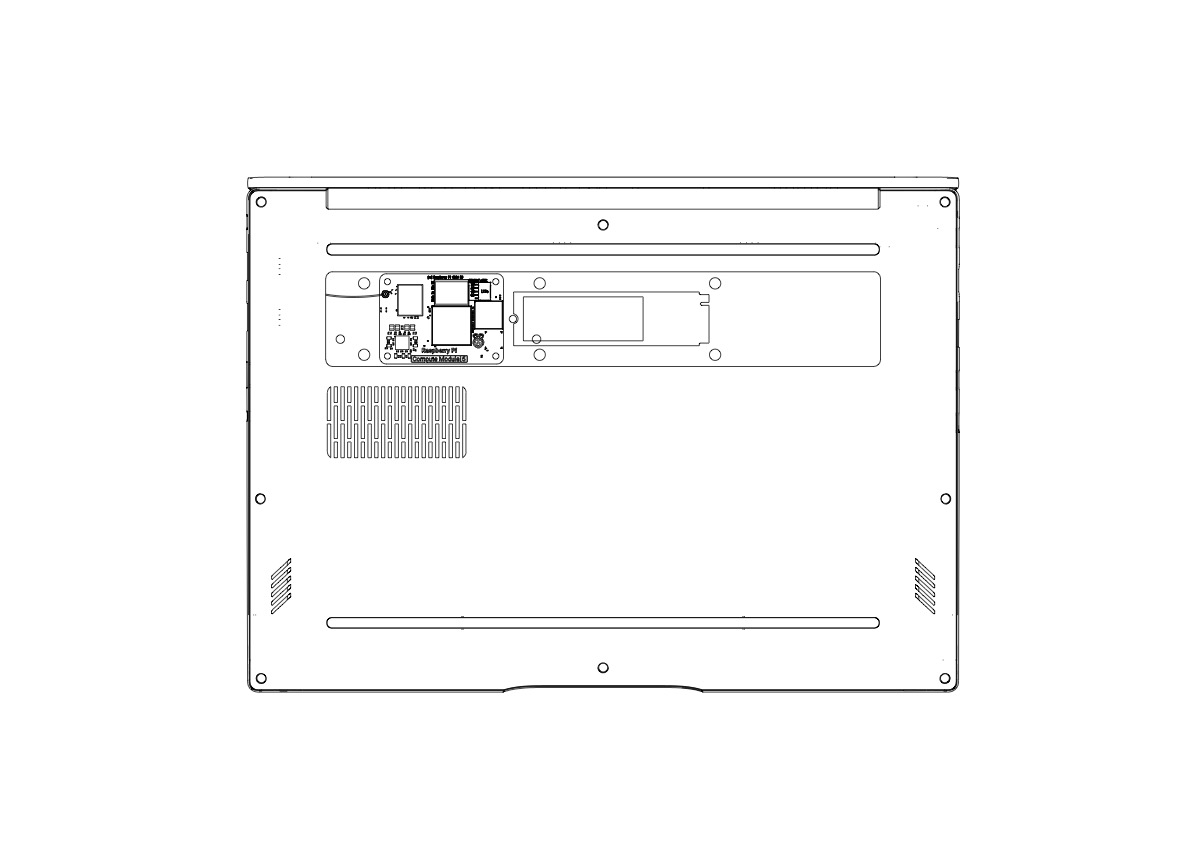
- Align the CM5 edge connector vertically with the socket on the carrier board
- Press the module down evenly and firmly until fully seated
- Do not force the module if resistance is felt — re-check alignment before applying further pressure
Fig 8: CM5 Board and NVMe SSD Placement
¶ Step 4 — Connect the Antenna
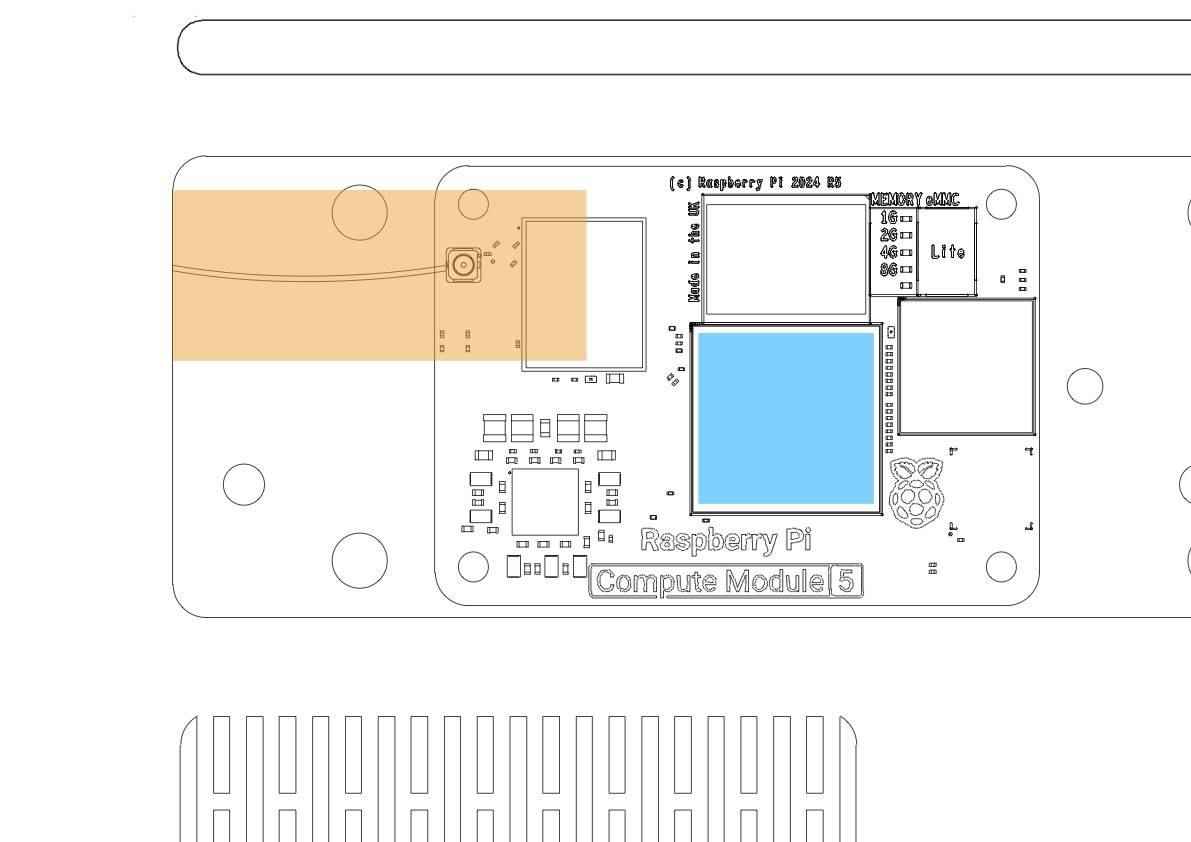
- Locate the antenna socket at the upper-left corner of the CM5 (shown in orange in Fig 9)
- Press the antenna connector firmly onto the socket until it clicks into place
- Ensure the antenna wire is not pinched against the chassis body — grounding the antenna to the metal enclosure will degrade wireless performance
- Secure the CM5 module using the provided screws
⚠️ Warning: Do not overtighten the CM5 mounting screws. Excessive torque can cause the CM5 edge connector pins to misalign with the socket, resulting in intermittent failures or a non-booting system.
Fig 9: Antenna Connector (orange) and Thermal Pad Placement (blue)
To enable the external antenna, add the following line to /boot/firmware/config.txt:
dtparam=ant2
📝 Note: Without this setting, the CM5 will default to its internal antenna. Wi-Fi signal strength may be reduced inside the aluminum chassis if this parameter is not set.
¶ Step 5 — Apply Thermal Pads
Apply 1 mm thermal pads to the following components:
Required:
- CM5 CPU die (shown in blue in Fig 9)
- M.2 NVMe SSD (if installed)
Optional but recommended:
- RP1 I/O controller chip on the CM5
- Power management ICs on the CM5
Ensure each thermal pad is properly aligned and fully covers the target component surface before proceeding.
📝 Note: Correct thermal pad placement is important for sustained performance. The Argon THRML cover transfers heat away from the CM5 through direct contact — gaps or misalignment will reduce cooling effectiveness.
¶ Step 6 — Reinstall the THRML Cover
Carefully reposition the Argon THRML cover and secure it using the original screws.
⚠️ Warning: Ensure the THRML cover is oriented right-side up. Installing it upside down may cause the cover to press the antenna wire against the aluminum chassis, grounding the antenna and degrading wireless connectivity.
¶ Step 7 — Power On
Once assembly is complete, press the power button to start the system.
¶ Software Configuration
¶ First Boot: Enable Keyboard & Trackpad
¶ Raspberry Pi OS
On Raspberry Pi OS, the keyboard and trackpad are enabled automatically at first boot.
These input devices connect to the CM5 through the internal USB hub, which is active by default in Raspberry Pi OS. No additional configuration is required.
¶ Other Debian-Based Distributions (e.g., Ubuntu)
For other Debian-based distributions, the internal USB hub interface must be enabled before or at first boot.
Option A — Edit config.txt before first boot (recommended)
Mount the storage device on a separate computer, then open /boot/firmware/config.txt and add the following lines under the [all] section:
dtoverlay=dwc2,dr_mode=host
dtparam=pciex1_gen=3
dtparam=ant2
📝 Note: The folder path
/boot/firmware/is correct for Ubuntu on Raspberry Pi. On other Debian flavors, this may be/boot/instead. Verify before editing.
These settings:
- Enable the internal USB hub (required for keyboard, trackpad, camera, and speakers)
- Set the PCIe interface to Gen 3 speed for NVMe performance
- Activate the external Wi-Fi antenna
Option B — Use an External USB Keyboard and Mouse
If you cannot edit config.txt before first boot:
- Connect an external USB keyboard and mouse to any USB Type-A port
- Boot into the operating system
- Open a terminal and edit the configuration file:
sudo nano /boot/firmware/config.txt
- Add the required settings under
[all]:
dtoverlay=dwc2,dr_mode=host
dtparam=pciex1_gen=3
dtparam=ant2
- Save the file and reboot:
sudo reboot
After reboot, the internal keyboard, trackpad, camera, and speakers will be active.
¶ Enable Custom Laptop Features
To enable additional laptop-specific functionality beyond the default Raspberry Pi OS configuration, install the Argon ONE UP configuration package using the provided installation script.
¶ Supported Features
| Feature | Description |
|---|---|
| Battery status | Displays current battery level |
| Pause key shortcut | Press Pause to show battery status on screen |
| Lid-close behavior | Automatically shuts down the system after a preset delay |
| Screen brightness — decrease | Fn + F2 |
| Screen brightness — increase | Fn + F3 |
📝 Note: Raspberry Pi platforms do not support true sleep or suspend modes. Without the lid-close shutdown behavior configured, closing the lid will leave the system running and draining the battery.
¶ Installation
Step 1 — Run the installation script
Supported on Raspberry Pi OS and Ubuntu. Open a terminal and run:
curl https://download.argon40.com/argononeup.sh | bash
Step 2 — Reboot
sudo reboot
Step 3 — Open the configuration tool
argon-config
Follow the on-screen menu to configure lid-close behavior, brightness steps, and other preferences.
¶ What the Script Does
During installation, the script will:
- Verify that your operating system and firmware are up to date, and apply updates if needed
- Install the Argon ONE UP background services
- Install required configuration overlays
- Add a desktop icon showing live battery status
¶ Adjusting Display Settings (ddcutil / ddcui)
To adjust color, brightness, or contrast settings on the integrated display, install ddcutil and its graphical front-end ddcui. These tools communicate with the display over the I2C bus exposed through the HDMI interface.
Step 1 — Update the system
sudo apt update && sudo apt upgrade -y
Step 2 — Enable I2C
Using raspi-config (recommended):
sudo raspi-config
Navigate to 3 Interface Options → I5 I2C, select Yes, then reboot when prompted.
Manually (if raspi-config is unavailable):
sudo nano /boot/firmware/config.txt
Ensure the following line is present (KMS driver is required):
dtoverlay=vc4-kms-v3d
📝 Note: Use
vc4-kms-v3d, notvc4-fkms-v3d. The full KMS driver is required for DDC/CI I2C access to work correctly.
Then load the I2C device module at boot:
echo i2c_dev | sudo tee -a /etc/modules
sudo reboot
Step 3 — Install ddcutil and ddcui
sudo apt install ddcutil ddcui
Step 4 — Verify detection
sudo ddcutil detect
This should list the integrated display and its DDC/CI capabilities. The display will appear as a device on an /dev/i2c-N bus.
📝 Note: If
detectreturns "No displays found," this may be related to a kernel or firmware interaction specific to Raspberry Pi 5. See the ddcutil Raspberry Pi documentation and the related GitHub issue for current workarounds.
Step 5 — Launch the GUI
ddcui
In the application, navigate to View → Features to adjust brightness, contrast, and color settings.
¶ Setup Boot Mode on ONE UP CM5 Laptop
Boot Mode is required when flashing an operating system to a CM5 with onboard eMMC storage.
¶ Step 1 — Ensure the Laptop Is Powered Off
Confirm that the Power LED is off before proceeding. The system must be fully powered down before switching to OTG mode.
¶ Step 2 — Set the OTG Switch to OTG Mode
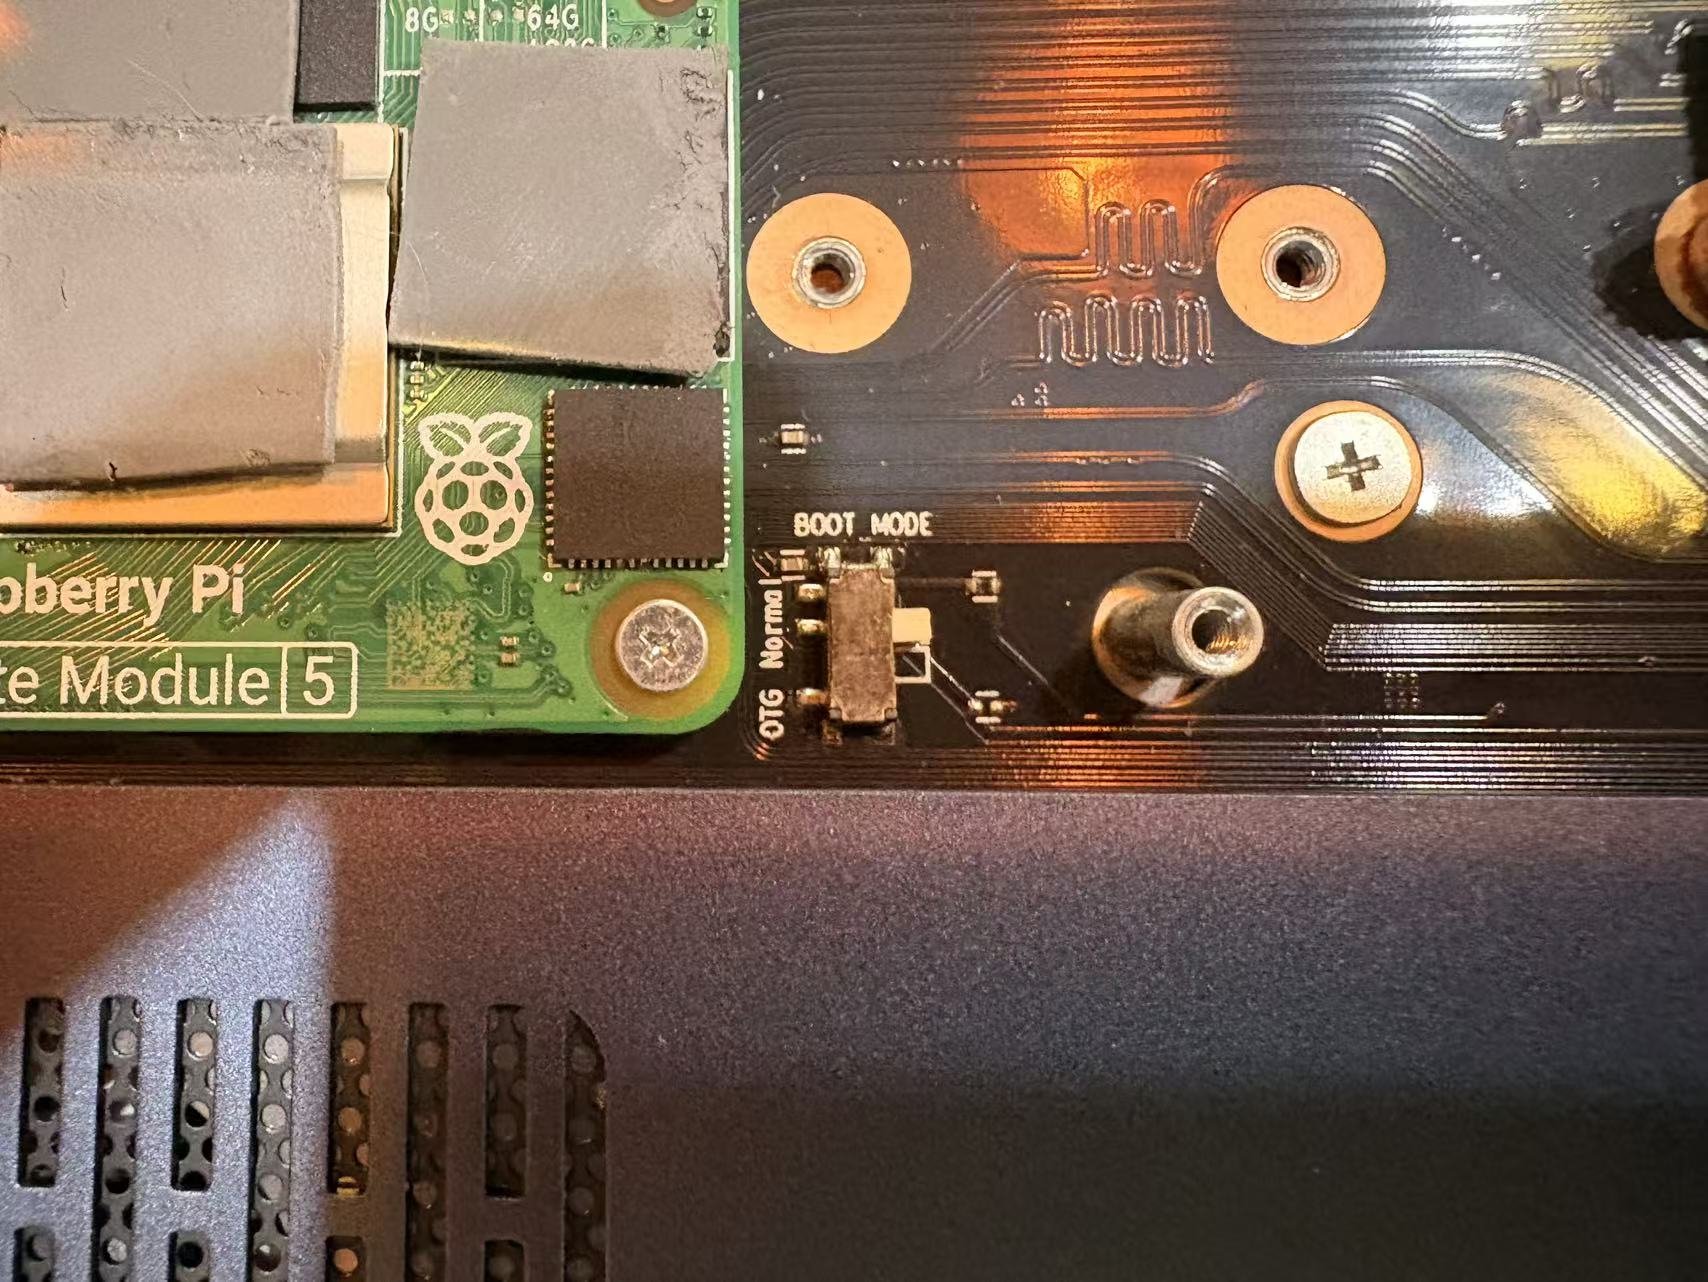
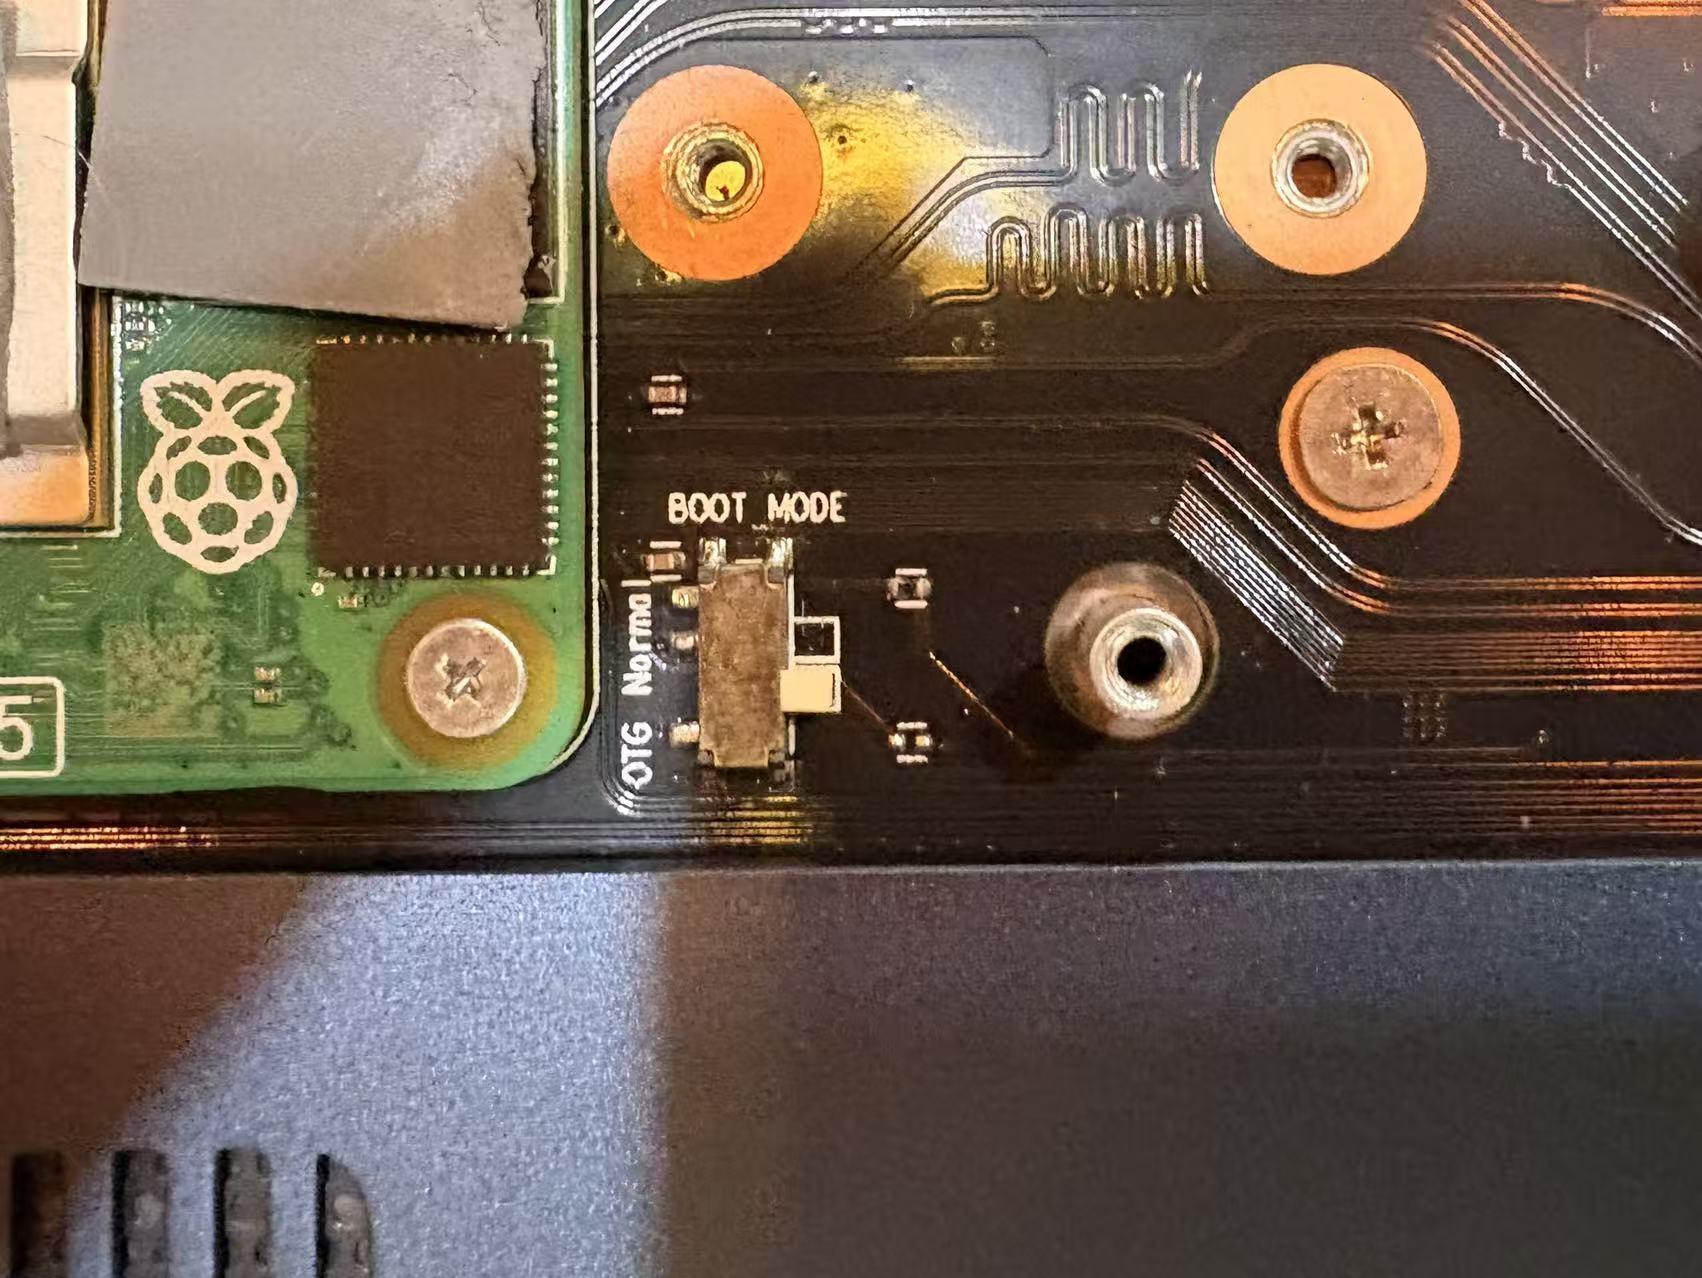
Locate the OTG switch on the lower-right side of the CM5 module inside the chassis and slide it to the OTG position.
Fig 10: OTG Boot Mode Switch Location
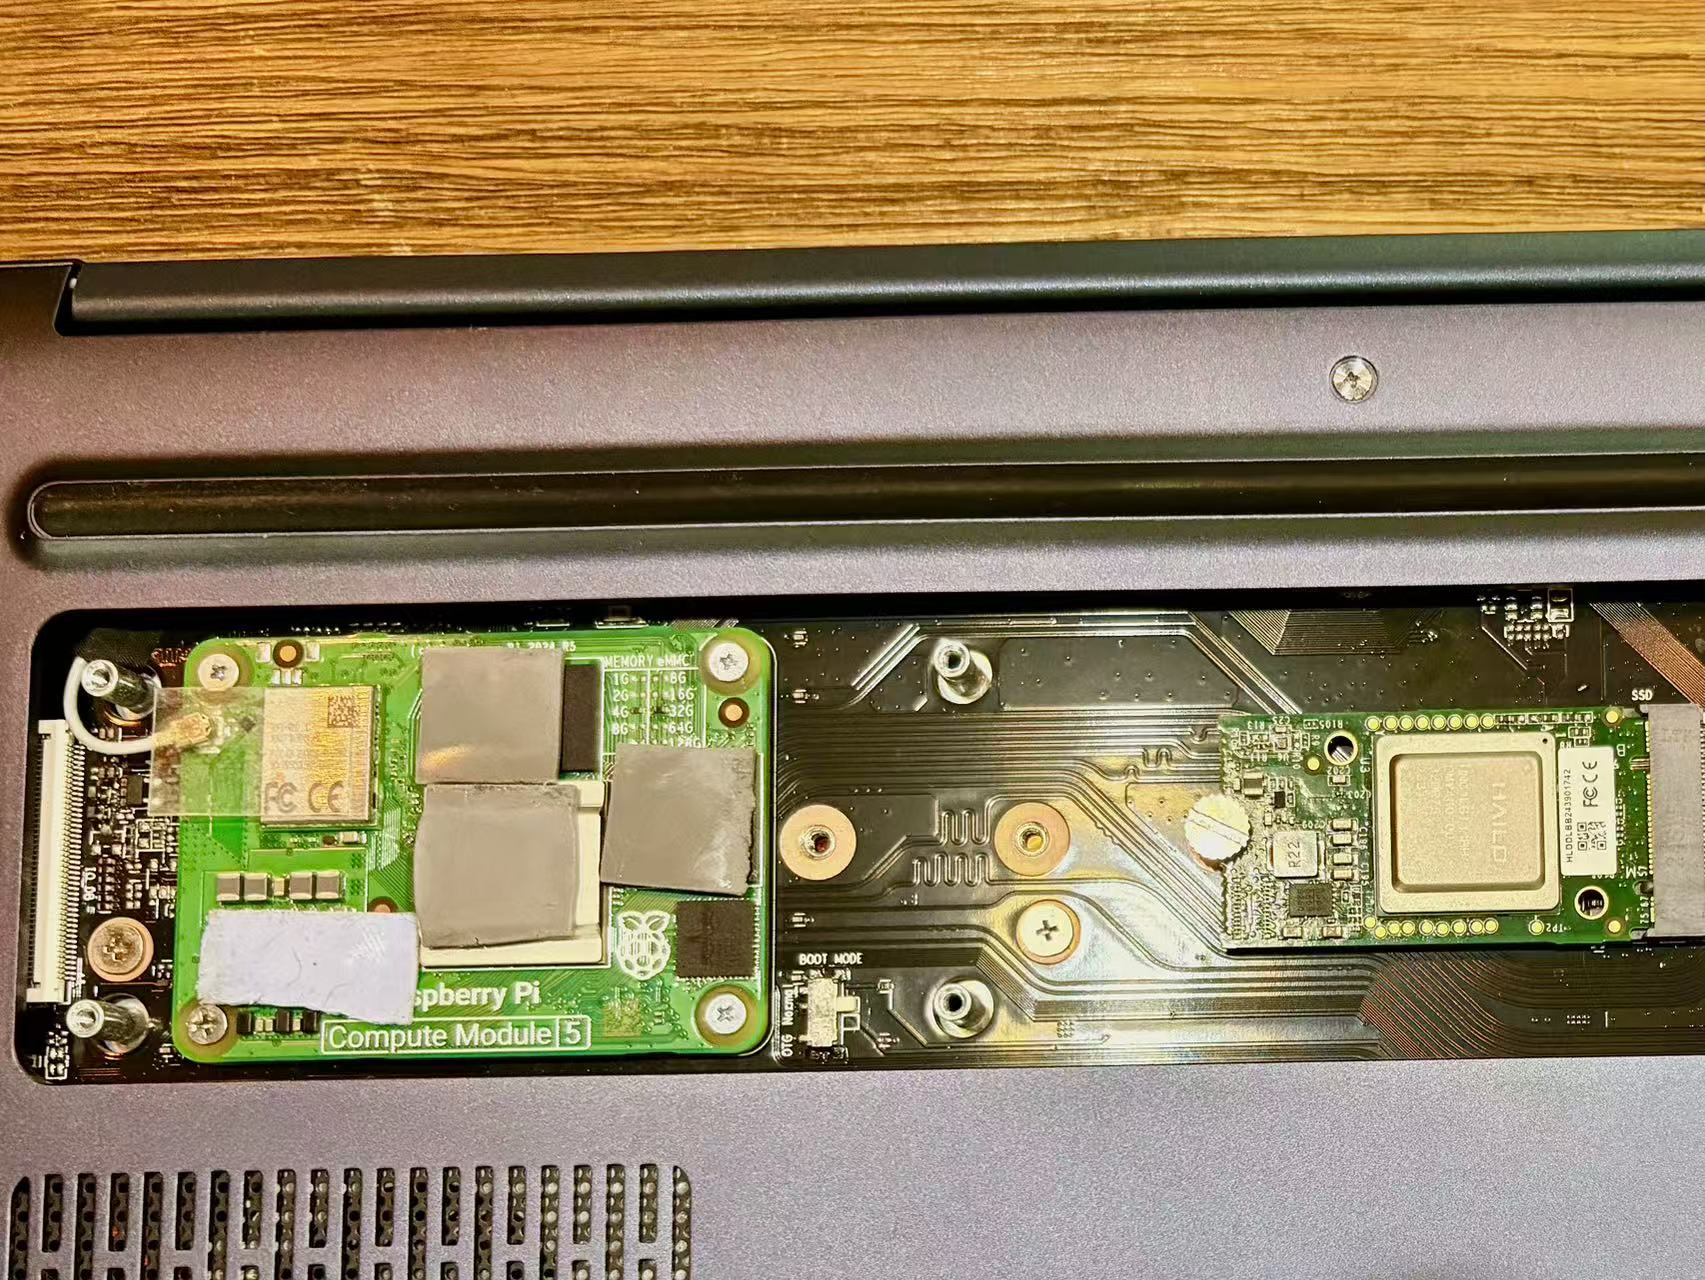
Fig 11: Normal Mode
⚠️ Warning: Always ensure this switch is returned to Normal mode before regular use. The system will not boot while the switch is in OTG mode.
Fig 12: OTG Boot Mode
¶ Step 3 — Connect to Your Host Computer
Connect a USB-C data cable from Item 19 (upper-left USB-C port on the laptop) to a USB port on your host computer.
Fig 13: Argon ONE UP USB-C to Host PC
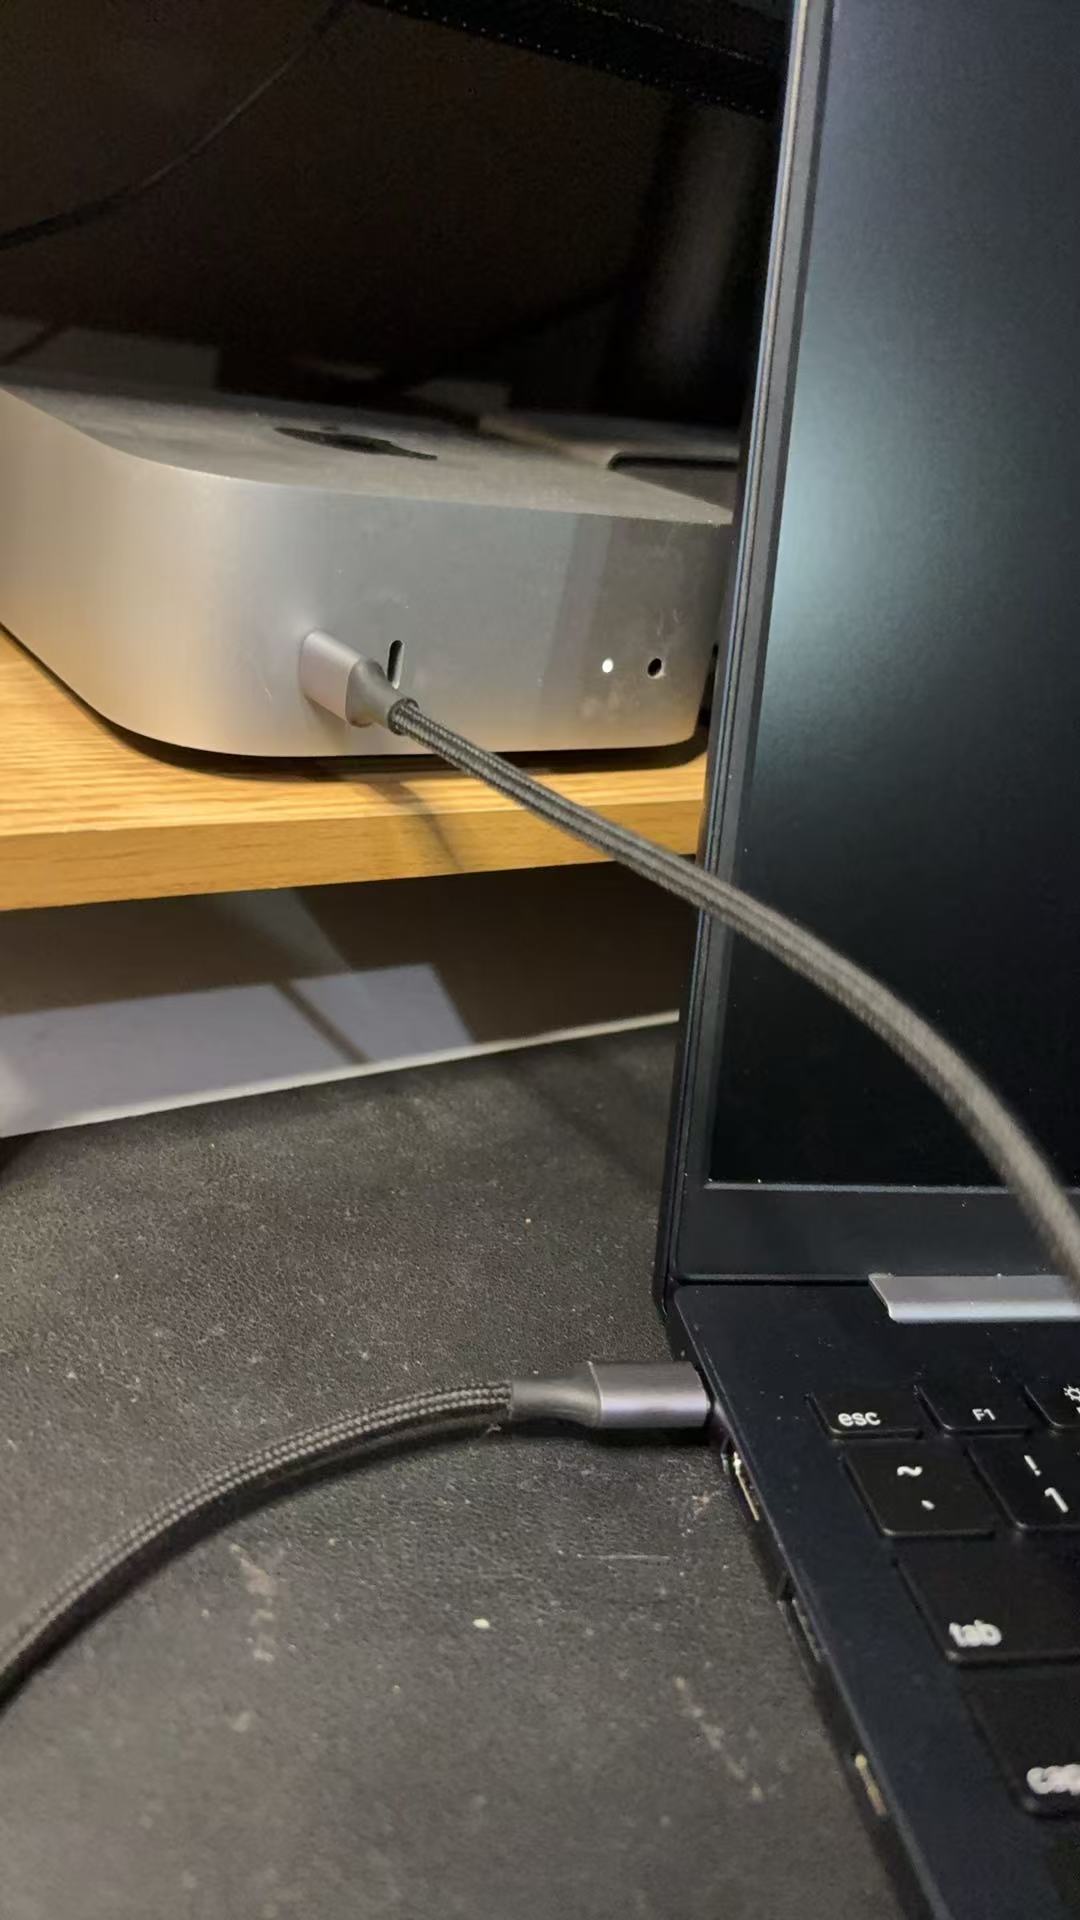
📝 Note: Use a cable that supports data transfer, not a charge-only cable. Many USB-C cables are charge-only and will not establish the OTG data connection.
¶ Step 4 — Power On the Laptop
Press the power button. The system will boot in OTG mode, and the CM5 eMMC storage will become accessible from the host computer.
¶ Mount the eMMC Storage Using usbboot
To access the CM5 eMMC from your host computer, use the Raspberry Pi usbboot utility. The following steps apply to macOS and Linux host systems.
¶ Step 1 — Install the Required USB Library
On macOS (requires Homebrew):
brew install pkgconfig libusb
On Linux (Debian/Ubuntu):
sudo apt install libusb-1.0-0-dev
¶ Step 2 — Clone the usbboot Repository
git clone --depth=1 https://github.com/raspberrypi/usbboot
¶ Step 3 — Build the rpiboot Executable
cd usbboot
make
¶ Step 4 — Mount the eMMC Storage
sudo ./rpiboot
After a few seconds, the eMMC will appear as a mounted volume on your host computer. The CM5 LED may illuminate during this process, indicating active read/write activity.
📝 Note: On macOS, the volume will appear on the Desktop or in Finder. On Linux, it will appear as a block device (e.g.,
/dev/sdX). Uselsblkto confirm the device path before writing.
¶ Flash Raspberry Pi OS to eMMC or M.2 NVMe
Once the eMMC is mounted (or the NVMe is connected via an external adapter), use Raspberry Pi Imager to flash the operating system.
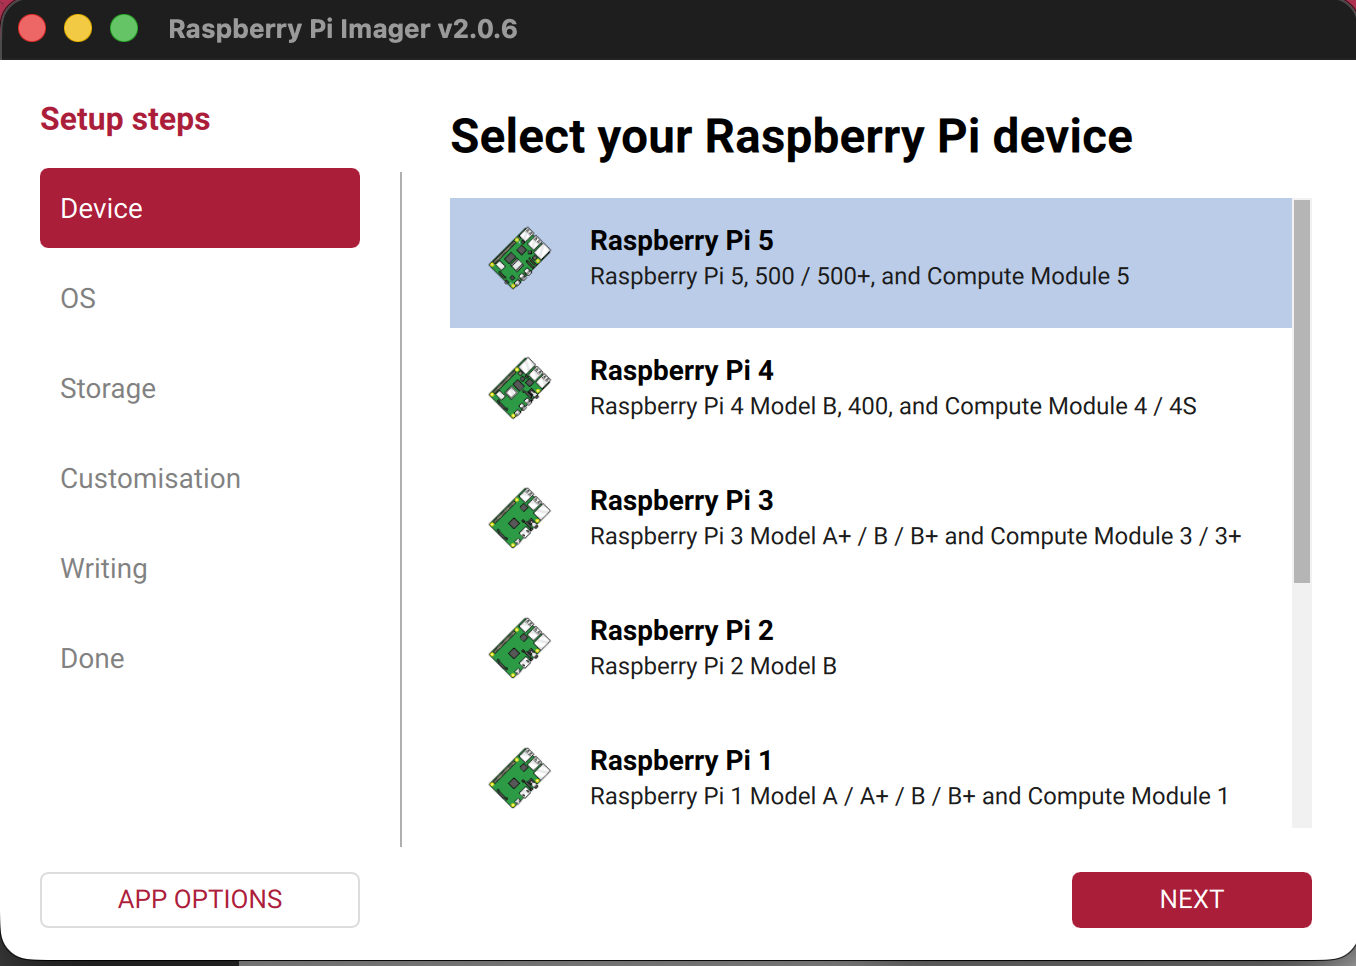
Step 1 — Launch Raspberry Pi Imager
Fig 14: Launch Imager
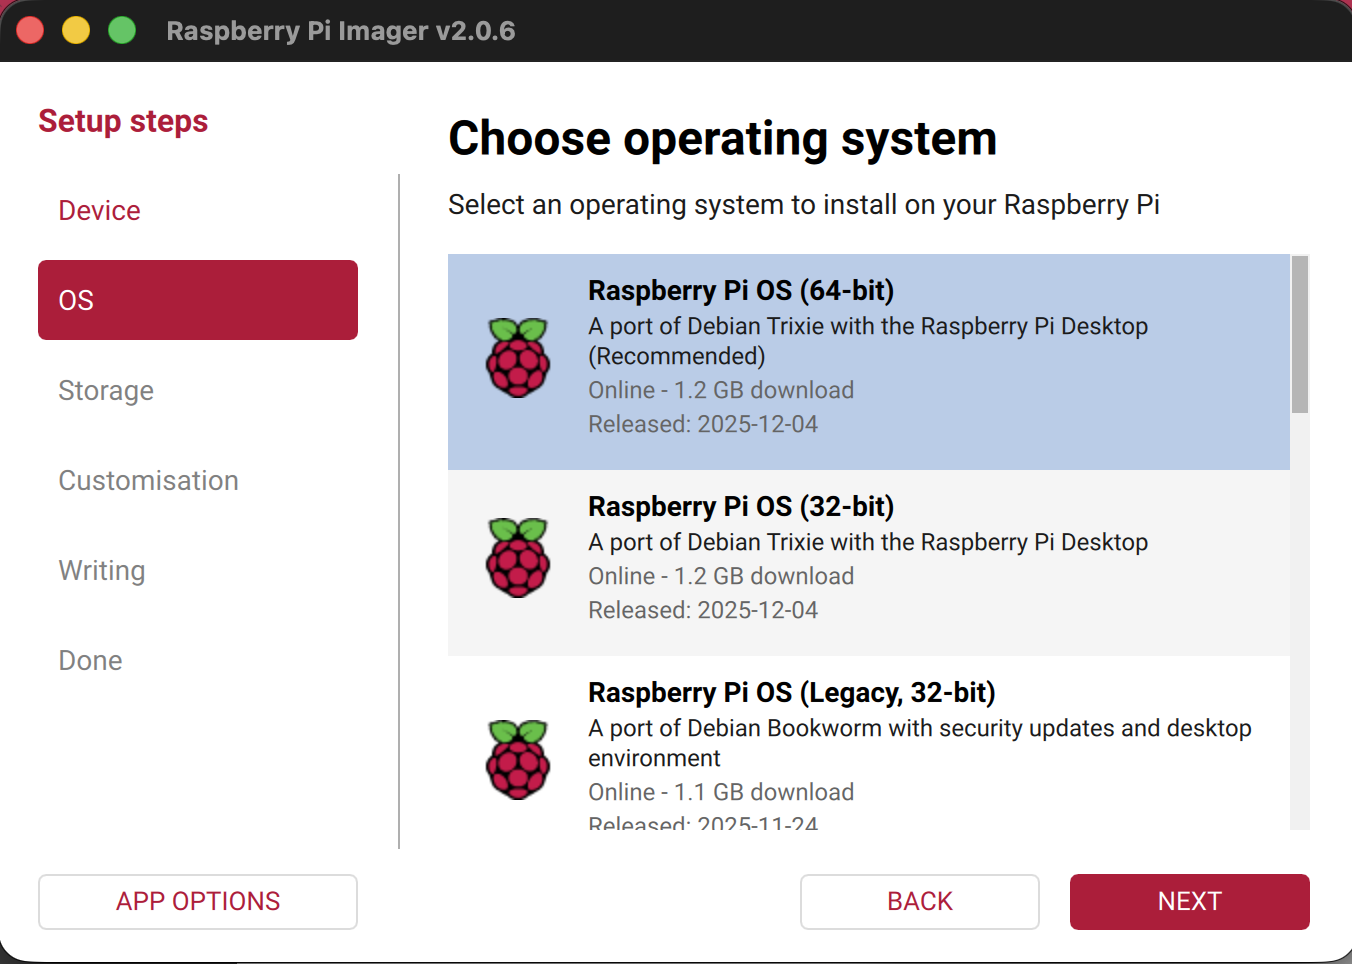
Step 2 — Select the operating system
Fig 15: Select OS
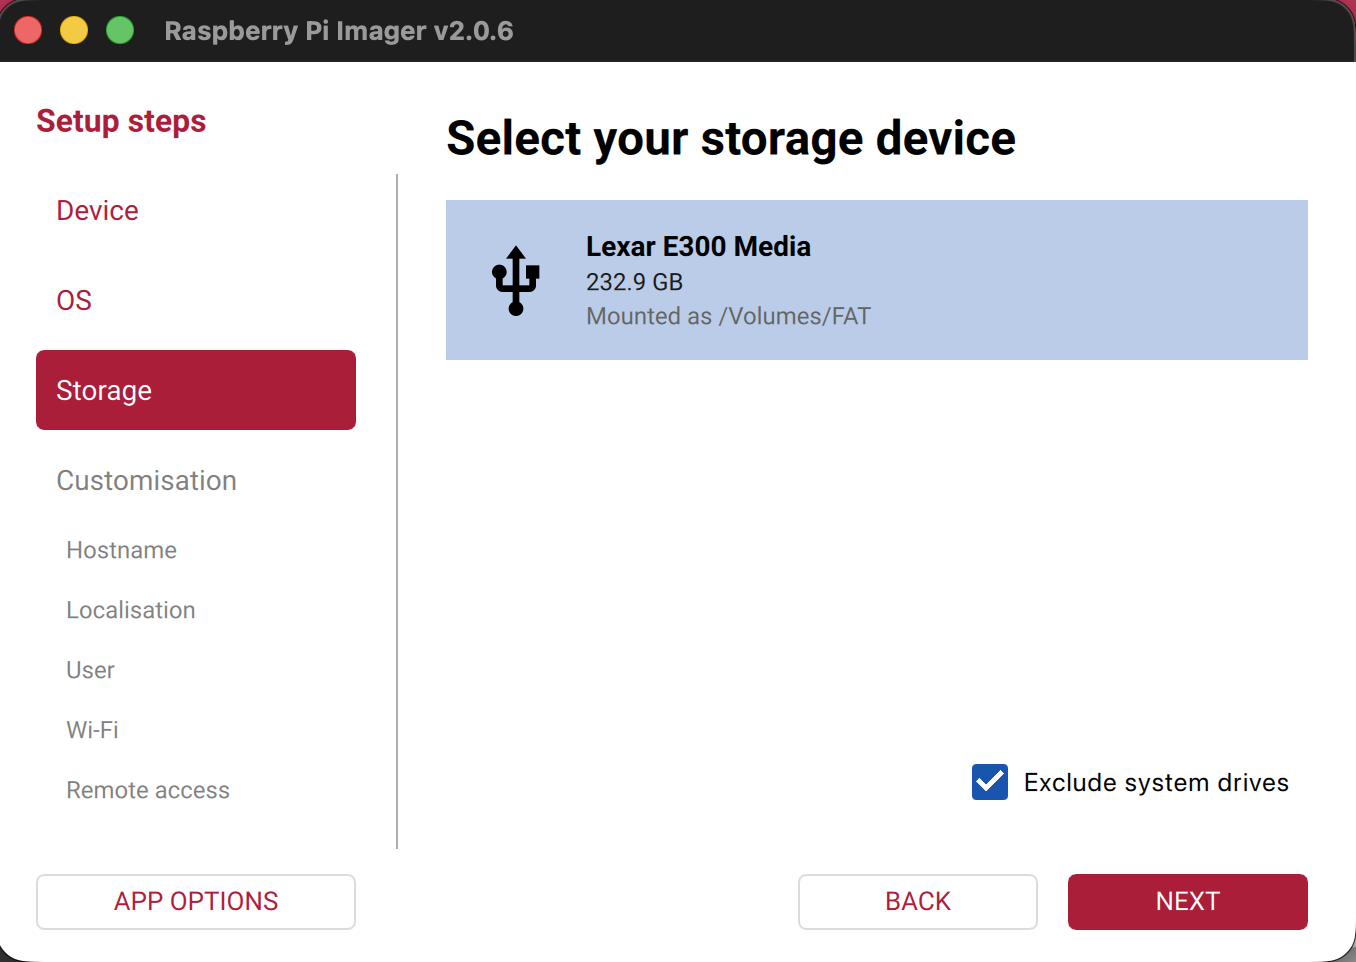
Step 3 — Select the target storage device
Choose either the mounted eMMC volume or the M.2 NVMe SSD as the destination.
Fig 16: Select Target Storage Device
Step 4 — Flash and eject
Proceed with the flashing process as guided by Raspberry Pi Imager. When complete, safely eject the eMMC volume from your host computer before disconnecting the USB-C cable.
Return the OTG switch to Normal mode, then power on the Argon ONE UP CM5 Laptop.
¶ Compatible Devices
| Component | Compatible Options | Notes |
|---|---|---|
| Compute Module | CM5 Lite (no eMMC), CM5 with eMMC — all RAM variants | All CM5 configurations supported |
| M.2 NVMe SSD | M-Key, 2242 / 2260 / 2280 | PCIe Gen 2 × 1 interface |
| microSD Card | Any standard microSD | Boot use only on CM5 Lite (no eMMC) |
| Operating System | Raspberry Pi OS (64-bit), Ubuntu 24.04 for Pi, other Debian-based distros | Raspberry Pi OS recommended for full feature support |
| 40-PIN GPIO Module | Argon ONE UP 40-PIN GPIO Module | Connects via modified USB-C ports 22 and 23 |
| AI Accelerator | Hailo-8L M.2 module | Use M.2 slot when CM5 with eMMC is installed |
| USB Charger | Any USB-C PD charger, 45 W minimum | Higher wattage (65 W+) recommended for simultaneous charging and full load |
¶ Troubleshooting
¶ Keyboard and trackpad are not working after first boot
Cause: The internal USB hub requires USB 2.0 to be active. On non-Raspberry Pi OS distributions, this interface is often disabled by default.
Fix: Add the following line to /boot/firmware/config.txt and reboot:
dtoverlay=dwc2,dr_mode=host
If you cannot type yet, connect an external USB keyboard and mouse to complete this step.
¶ Wi-Fi signal is weak or unavailable inside the chassis
Cause: The aluminum enclosure attenuates wireless signals. The CM5 may also be defaulting to its internal antenna instead of the external antenna routed through the chassis.
Fix: Confirm the antenna wire is connected to the CM5 antenna socket, that it is not pinched against the chassis body, and that the following line is present in /boot/firmware/config.txt:
dtparam=ant2
Reboot after making the change.
¶ The system does not boot — no display, no LED
Cause (most likely): The OTG boot mode switch (Item 24) has been left in the OTG position. The system will not complete a normal boot while in OTG mode.
Fix: Power off the unit. Open the chassis and confirm the switch is set to Normal mode. Power on again.
Secondary cause: CM5 is not fully seated in the socket.
Fix: Power off, open the chassis, remove the CM5, and reseat it evenly. Do not overtighten the mounting screws.
¶ NVMe SSD is not detected
Cause: PCIe Gen 3 may not be enabled, or the SSD form factor is not supported.
Fix: Confirm the SSD is M-Key and in a supported length (2242, 2260, or 2280). Then add the following line to /boot/firmware/config.txt:
dtparam=pciex1_gen=3
Reboot and check detection with:
lspci
or
ls /dev/nvme*
¶ Battery is not charging or the system shuts down under load
Cause: The USB-C charger output is below the 45 W minimum, or a charge-only cable is being used.
Fix: Use a USB-C PD charger rated at 45 W or higher. Verify the cable supports full USB-C PD negotiation (not a charge-only cable). Under sustained CPU load, a 65 W charger is recommended to power the system and charge the battery simultaneously.
¶ Internal speakers produce no audio
Cause: The speakers are connected through the internal USB hub. If USB 2.0 is not enabled, the audio device will not be recognized.
Fix: Ensure dtoverlay=dwc2,dr_mode=host is present in /boot/firmware/config.txt. Also confirm the correct audio output device is selected in your operating system's sound settings.
¶ CM5 eMMC is not detected by the host computer in Boot Mode
Cause: The OTG switch may not be fully engaged, a charge-only USB-C cable is being used, or usbboot has not been run yet.
Fix:
1. Confirm the OTG switch is in the OTG position
2. Replace the USB-C cable with one confirmed to carry data
3. Run sudo ./rpiboot on the host computer before powering on the laptop
4. Power on the laptop after rpiboot is running and waiting
¶ Screen brightness keys (Fn + F2 / Fn + F3) have no effect
Cause: The Argon ONE UP configuration package has not been installed.
Fix: Install the package and reboot:
curl https://download.argon40.com/argononeup.sh | bash
sudo reboot
¶ FAQ
Q: Does the Argon ONE UP work without an M.2 NVMe SSD?
Yes, if your CM5 variant has onboard eMMC storage, the system can boot from eMMC without any NVMe drive installed. You can also use the M.2 slot for a Hailo AI accelerator module in that configuration. A CM5 Lite (no eMMC) requires either an NVMe SSD or a microSD card to boot.
Q: Can I install any Linux distribution, or only Raspberry Pi OS?
You can install any Debian-based distribution with Raspberry Pi 5 support, including Ubuntu 24.04. However, Raspberry Pi OS is recommended for the best out-of-box experience. Other distributions require manual config.txt edits before the keyboard, trackpad, and speakers will work. The Argon ONE UP script currently supports Raspberry Pi OS and Ubuntu.
Q: What size and type of M.2 SSD is compatible?
The M.2 slot accepts M-Key NVMe drives in the following lengths: 2242, 2260, and 2280. SATA M.2 drives (B-Key or B+M-Key) are not compatible — the slot is PCIe only. The interface runs at PCIe Gen 2 × 1 by default, with Gen 3 optionally enabled via config.txt.
Q: Can I use the 40-PIN GPIO at the same time as the USB-C ports on the left side?
Partially. When the Argon ONE UP 40-PIN GPIO Module is connected using ports 22 and 23, port 22 continues to function as a USB 2.0 port, but port 23 carries no USB data. You cannot use both ports simultaneously for independent USB devices while the GPIO module is attached.
Q: Why won't the laptop boot after I was flashing the eMMC?
The most common cause is that the OTG switch was not returned to Normal mode after the flashing session. Open the chassis, confirm the switch position, and power on again.
Q: Does the internal battery support hot-swap or pass-through charging?
The SC89171 power management IC supports simultaneous charging and system operation. The system will draw power from the USB-C PD input while also charging the battery. There is no true hot-swap capability — if the charger is disconnected, the system transitions to battery power seamlessly, but the battery itself cannot be removed while the system is running.
Revision: 1 · Published: 2026-07-17 14:26 UTC
Managed by Argon Wiki Tool · View live page