¶ Ubuntu OS Setup — Argon ONE V3 / Argon ONE V5 / Argon NEO 5 NVMe
This guide walks you through setting up Ubuntu OS on a Raspberry Pi 5 paired with an Argon ONE V3, Argon ONE V5, or Argon NEO 5 NVMe case. It covers bootloader preparation, NVMe boot configuration, Argon script installation, and post-install configuration.
¶ Table of Contents
- Overview & Requirements
- Section A — Update Bootloader of Raspberry Pi 5
- Section B — Flash Ubuntu to NVMe SSD
- Section C — Setup Argon Script on Ubuntu
- Section D — Argon Configuration Tool
- Troubleshooting
- FAQ
¶ Overview & Requirements
To use Ubuntu OS with a PCIe NVMe SSD in an Argon case, your Raspberry Pi 5 must have the latest bootloader and EEPROM firmware installed before you attempt to boot from the NVMe drive. Skipping this step is the most common cause of NVMe boot failures.
¶ What You Will Need
- Raspberry Pi 5 (any RAM variant)
- Argon ONE V3, Argon ONE V5, or Argon NEO 5 NVMe case
- A compatible M.2 NVMe SSD (PCIe Gen 2 or Gen 3, M-key)
- A microSD card (8 GB or larger) for the initial bootloader update
- A second computer or the Raspberry Pi itself to flash the Ubuntu image
- Raspberry Pi Imager (v1.8.5 or later) or
dd/Balena Etcher for flashing - An active internet connection on the Raspberry Pi
📝 Note: Ubuntu on Raspberry Pi 5 requires Ubuntu 23.10 (Mantic Minotaur) or later. Ubuntu 24.04 LTS is the recommended long-term-support option. Earlier releases do not support the Raspberry Pi 5 hardware.
📝 Note: Complete Section A first, even if your Raspberry Pi 5 is brand new. Out-of-the-box bootloader firmware is frequently outdated and may not support NVMe boot.
¶ Section A — Update Bootloader of Raspberry Pi 5
The Raspberry Pi 5 bootloader is stored in onboard EEPROM. Updating it ensures full PCIe/NVMe boot support and compatibility with the latest firmware features.
¶ Step 1 — Prepare a Raspberry Pi OS SD Card
Flash a fresh copy of Raspberry Pi OS (Bookworm or Trixie, Desktop version recommended) to a microSD card using Raspberry Pi Imager.
Insert the SD card into your Raspberry Pi 5, connect a display and keyboard, and power on. Once booted, open a Terminal and update the system:
sudo apt update
sudo apt upgrade
sudo reboot
📝 Note: Use the Desktop (full) version of Raspberry Pi OS rather than the Lite version. The desktop environment includes
raspi-configand related GUI tools which simplify the bootloader update process.
¶ Step 2 — Verify and Set System Date/Time
An incorrect system clock can cause EEPROM update failures. Before updating the bootloader, confirm the date and time are accurate:
date
If the date or time is wrong, set it manually:
sudo date -s "YYYY-MM-DD HH:MM:SS"
Replace YYYY-MM-DD HH:MM:SS with the current date and time, for example:
sudo date -s "2025-06-15 14:30:00"
Alternatively, force an NTP sync if you have internet access:
sudo timedatectl set-ntp true
timedatectl status
📝 Note: The EEPROM update process validates firmware signing timestamps. If your system clock is significantly incorrect, the update may be rejected or fail silently. Always confirm the time is accurate before proceeding.
¶ Step 3 — Update the Bootloader Firmware via raspi-config
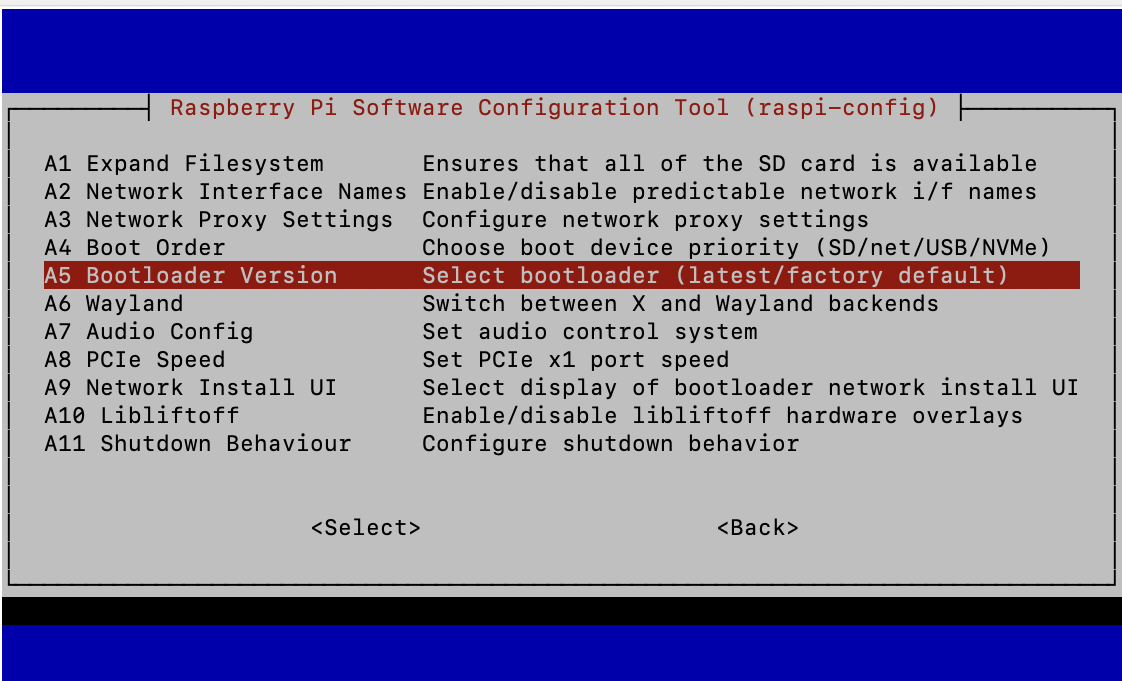
Open the Raspberry Pi configuration tool:
sudo raspi-config
Navigate to:
Advanced Options → Bootloader Version → Latest
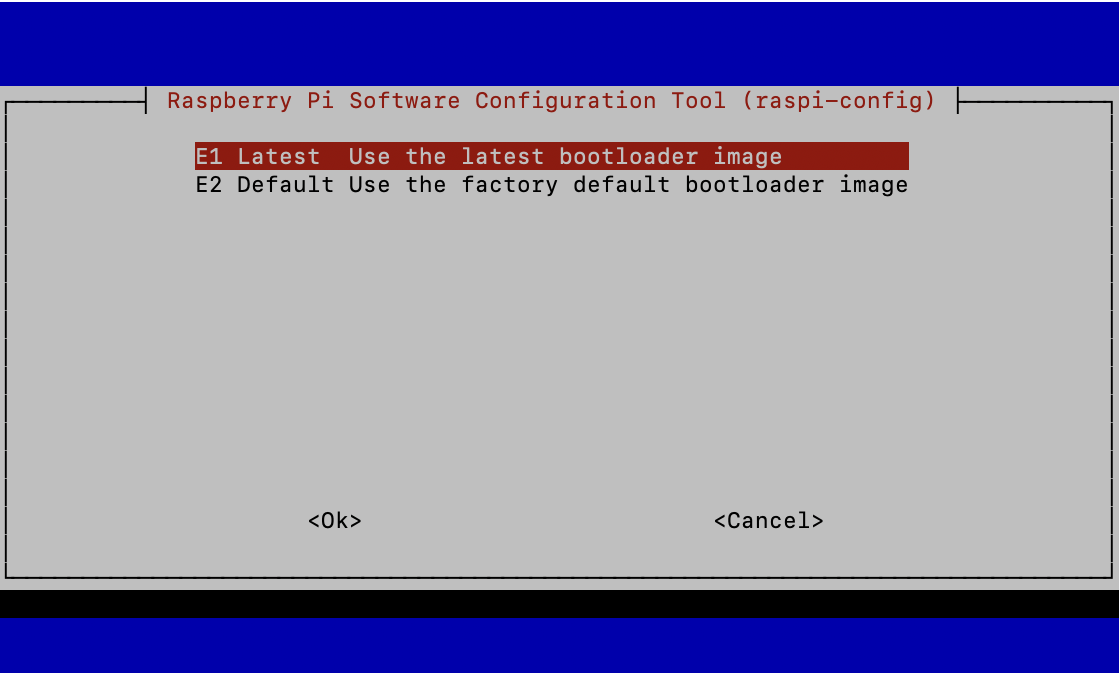
Select Latest and confirm. raspi-config will download and stage the latest bootloader image. Follow any on-screen prompts, then reboot when instructed:
sudo reboot
After rebooting, verify the bootloader version has been updated:
sudo rpi-eeprom-update
The output will show the current and latest available bootloader versions. If they match, the update was successful.
¶ Step 4 — Update the EEPROM Configuration
After updating the bootloader binary, update the EEPROM configuration to ensure PCIe boot order and NVMe settings are applied correctly:
sudo rpi-eeprom-config --apply /lib/firmware/raspberrypi/bootloader-2712/latest/pieeprom-*.bin
Or, to apply the update interactively using the default recommended settings:
sudo rpi-eeprom-config-update
To inspect your current EEPROM configuration at any time:
sudo rpi-eeprom-config
Confirm that the boot order includes NVMe (PCIe) as a boot target. The relevant line will look similar to:
BOOT_ORDER=0xf416
In this value, 6 represents NVMe/PCIe boot. If NVMe is not present in the boot order, you can edit the config:
sudo -E rpi-eeprom-config --edit
Change or add the BOOT_ORDER line so that NVMe boot is included, then save and reboot.
📝 Note: The boot order is read right to left.
0xf416means: try SD card (1) → USB (4) → NVMe/PCIe (6) → restart (f). Adjust the order to suit your setup — for NVMe-first booting, use0xf416or0xf461.
¶ Section B — Flash Ubuntu to NVMe SSD
¶ Step 1 — Download the Ubuntu Image
Download the correct Ubuntu image for Raspberry Pi 5 from the official Ubuntu website:
https://ubuntu.com/download/raspberry-pi
- Select Raspberry Pi 5 as the target hardware.
- Choose Ubuntu 24.04 LTS (64-bit) for the best long-term support.
- Download the
.img.xzcompressed image file.
📝 Note: Always use the 64-bit (arm64) image. 32-bit Ubuntu images are not available or supported for Raspberry Pi 5.
¶ Step 2 — Flash the Image to the NVMe SSD
You can flash the Ubuntu image to your NVMe SSD in one of the following ways:
Option A — Using Raspberry Pi Imager (Recommended)
- Install your NVMe SSD into the Argon case and connect the Argon case to the Raspberry Pi 5.
- Open Raspberry Pi Imager on a separate computer (with the SSD connected via USB-to-NVMe adapter), or boot the Raspberry Pi from the SD card and run Imager from there.
- Select Choose OS → Use Custom and select your downloaded Ubuntu
.img.xzfile. - Select your NVMe SSD as the target storage device.
- Apply any custom settings (hostname, SSH, Wi-Fi credentials) using the ⚙️ gear icon.
- Click Write and wait for the process to complete.
Option B — Using dd from the Terminal
# Identify your NVMe device (look for the correct disk size) lsblk¶ Flash the image (replace /dev/nvme0n1 with your actual device)
xzcat ~/Downloads/ubuntu-24.04-preinstalled-server-arm64+raspi.img.xz | sudo dd of=/dev/nvme0n1 bs=4M status=progress conv=fsync
📝 Note: Double-check the target device path before running
dd. Writing to the wrong device will permanently destroy data. Uselsblkorsudo fdisk -lto confirm the correct device name.
¶ Step 3 — Boot from the NVMe SSD
- Remove the microSD card from the Raspberry Pi 5.
- Power on the Raspberry Pi 5 inside the Argon case.
- Ubuntu should boot from the NVMe SSD automatically.
On the first boot, Ubuntu will run an initialisation process that may take 2–4 minutes. If connected to a display, you will see a login prompt once the process completes.
📝 Note: If the Raspberry Pi does not boot from the NVMe SSD, confirm that the EEPROM boot order includes PCIe/NVMe (see Section A, Step 4). Also ensure the SSD is fully seated in the M.2 slot and secured with the retention screw.
¶ Section C — Setup Argon Script on Ubuntu
The Argon script installs the fan controller daemon, power button driver, and configuration utilities required for your Argon case to function correctly.
¶ Step 1 — Boot into Ubuntu and Update the System
Once Ubuntu has booted from the NVMe SSD, open a Terminal and bring the system fully up to date:
sudo apt update
sudo apt upgrade -y
sudo reboot
📝 Note: Always update the system before installing the Argon script. Running the script on a partially updated system can cause dependency conflicts or installation failures.
¶ Step 2 — Install curl
The Argon installation script is fetched using curl. Confirm it is installed:
curl --version
If curl is not found, install it:
sudo apt install curl -y
¶ Step 3 — Run the Argon Installation Script
Select and run the script that matches your Argon case model:
Argon NEO 5 NVMe
curl https://download.argon40.com/argonneo5.sh | bash
Argon ONE V3
curl https://download.argon40.com/argon1.sh | bash
Argon ONE V5
curl https://download.argon40.com/argon1v5.sh | bash
📝 Note: Use only the script that corresponds to your specific case model. Running the wrong script may install an incorrect fan control profile, resulting in improper thermal management or a non-functional power button.
The script will:
- Install the Argon fan controller service (argononed)
- Install the Argon power button daemon
- Register both services to start automatically on boot
- Install the argon-config command-line configuration tool
Once the script completes, reboot the system:
sudo reboot
¶ Step 4 — Verify the Argon Services Are Running
After rebooting, confirm both Argon services are active:
sudo systemctl status argononed.service
sudo systemctl status argonone-powerbutton.service
Both services should show active (running). If either service shows failed or inactive, refer to the Troubleshooting section below.
¶ Section D — Argon Configuration Tool
Once the Argon script is installed, use the argon-config tool to customise fan behaviour, power button actions, and other case settings.
¶ Launching argon-config
Open a Terminal and run:
argon-config
¶ Configuration Options
The interactive menu presents the following options:
| Option | Description |
|---|---|
| Fan Speed | Set custom temperature-to-fan-speed mappings. Define the fan percentage at each temperature threshold. |
| Power Button | Configure what happens when the power button is pressed once, double-pressed, or held. Typical actions include shutdown, reboot, or sleep. |
| Hysteresis | Set a temperature buffer to prevent the fan from rapidly switching on and off around a threshold boundary. |
| Reset to Defaults | Restore all Argon settings to their factory defaults. |
| Uninstall | Remove all Argon scripts, services, and configuration files from the system. |
¶ Example — Setting a Custom Fan Curve
When prompted by argon-config, you can define up to five temperature/speed pairs. A conservative example:
| CPU Temperature (°C) | Fan Speed (%) |
|---|---|
| 50 | 10 |
| 60 | 25 |
| 70 | 55 |
| 80 | 85 |
| 90 | 100 |
📝 Note: Fan speed percentages below 10% may not be sufficient to spin up the fan motor from a stopped state. If you experience fan startup issues, set the minimum active speed to at least 10–15%.
¶ Troubleshooting
¶ 1. Raspberry Pi 5 Does Not Boot from the NVMe SSD
Symptoms: The board does not boot, or it falls back to booting from the SD card.
Steps to resolve:
- Confirm the EEPROM bootloader is up to date (Section A).
- Run sudo rpi-eeprom-config and verify BOOT_ORDER includes 6 (NVMe/PCIe).
- Remove the SD card entirely and retry booting — the board will not automatically fall through to NVMe if an SD card with a valid boot partition is inserted.
- Reseat the NVMe SSD in the M.2 slot and ensure the retention screw is tight.
- Confirm the NVMe SSD is a supported form factor (M.2 M-key, 2230 or 2242 depending on case model).
- Test the SSD in a USB enclosure to confirm it is not faulty.
¶ 2. Argon Installation Script Fails or Produces Errors
Symptoms: The curl | bash command returns errors, or the script exits prematurely.
Steps to resolve:
- Ensure curl is installed: sudo apt install curl -y
- Confirm you have an active internet connection: ping -c 4 download.argon40.com
- Ensure you ran sudo apt update && sudo apt upgrade -y before running the script.
- Check that you are using the correct script URL for your case model (Section C, Step 3).
- If you receive a permissions error, do not run the script as root — run it as your standard user with sudo privileges.
¶ 3. Fan Is Not Spinning or Responds Incorrectly to Temperature
Symptoms: The fan does not spin even when the CPU is hot, or it runs at full speed constantly.
Steps to resolve:
- Confirm the argononed service is running: sudo systemctl status argononed.service
- If the service is not running, attempt to start it: sudo systemctl start argononed.service
- Check service logs for errors: sudo journalctl -u argononed.service -n 50
- Confirm the fan cable is correctly connected to the Argon case's internal fan header.
- Re-run argon-config and verify the fan curve thresholds are set correctly.
- If the fan runs at 100% constantly, try increasing the lowest temperature threshold so the fan does not activate at idle.
¶ 4. Power Button Does Not Work After Script Installation
Symptoms: Pressing the power button has no effect, or the Raspberry Pi does not shut down cleanly.
Steps to resolve:
- Confirm the power button service is running: sudo systemctl status argonone-powerbutton.service
- Restart the service if needed: sudo systemctl restart argonone-powerbutton.service
- Check the service logs: sudo journalctl -u argonone-powerbutton.service -n 50
- Ensure the I2C interface is enabled. Ubuntu enables I2C by default on