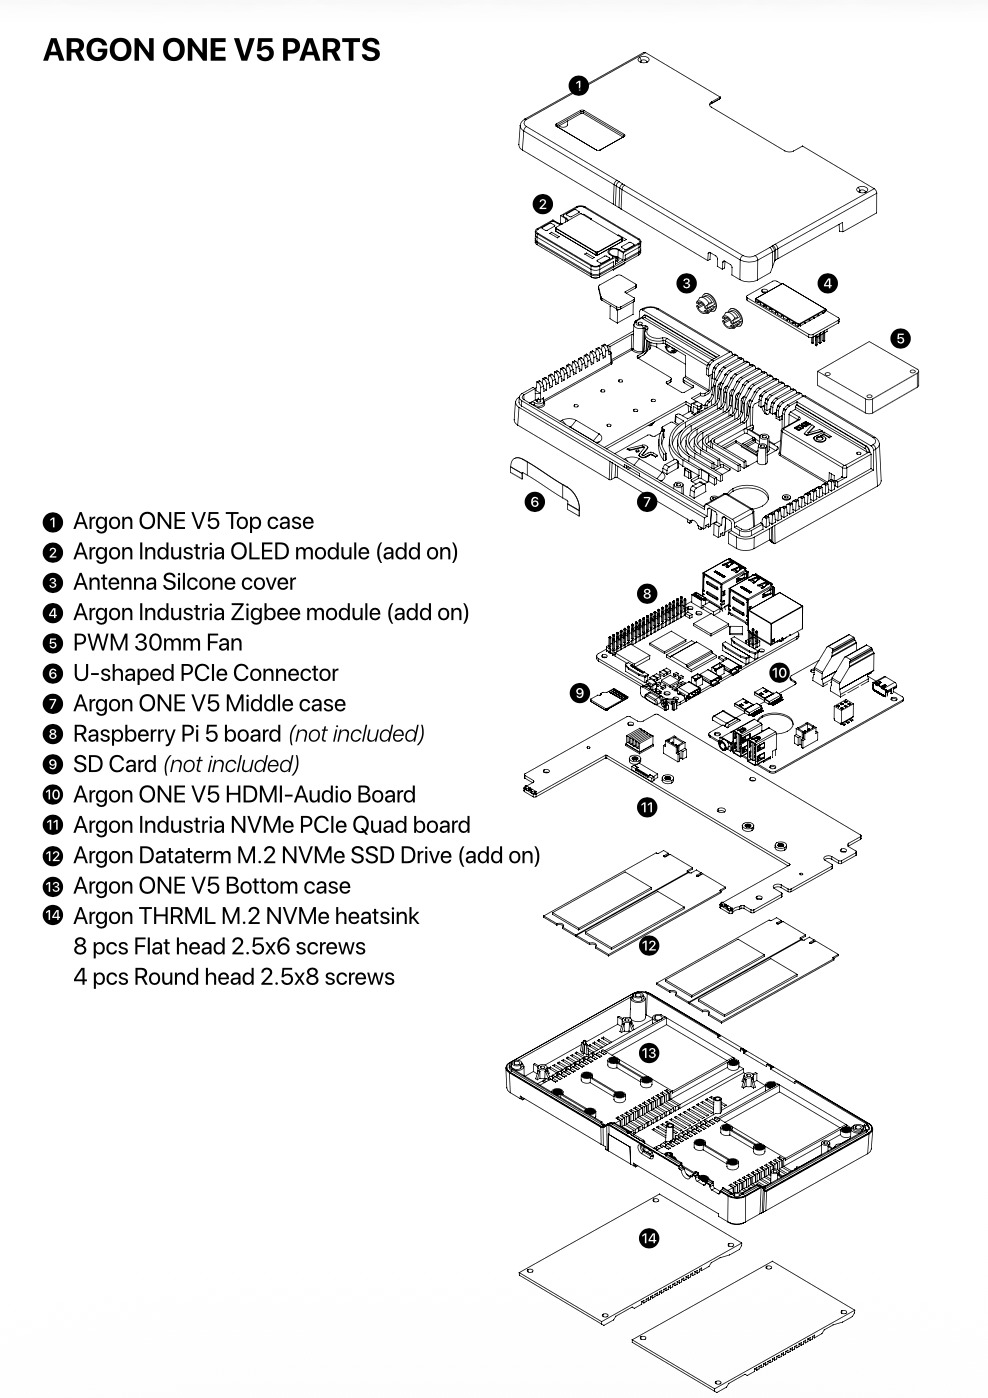
¶ Parts and Specifications
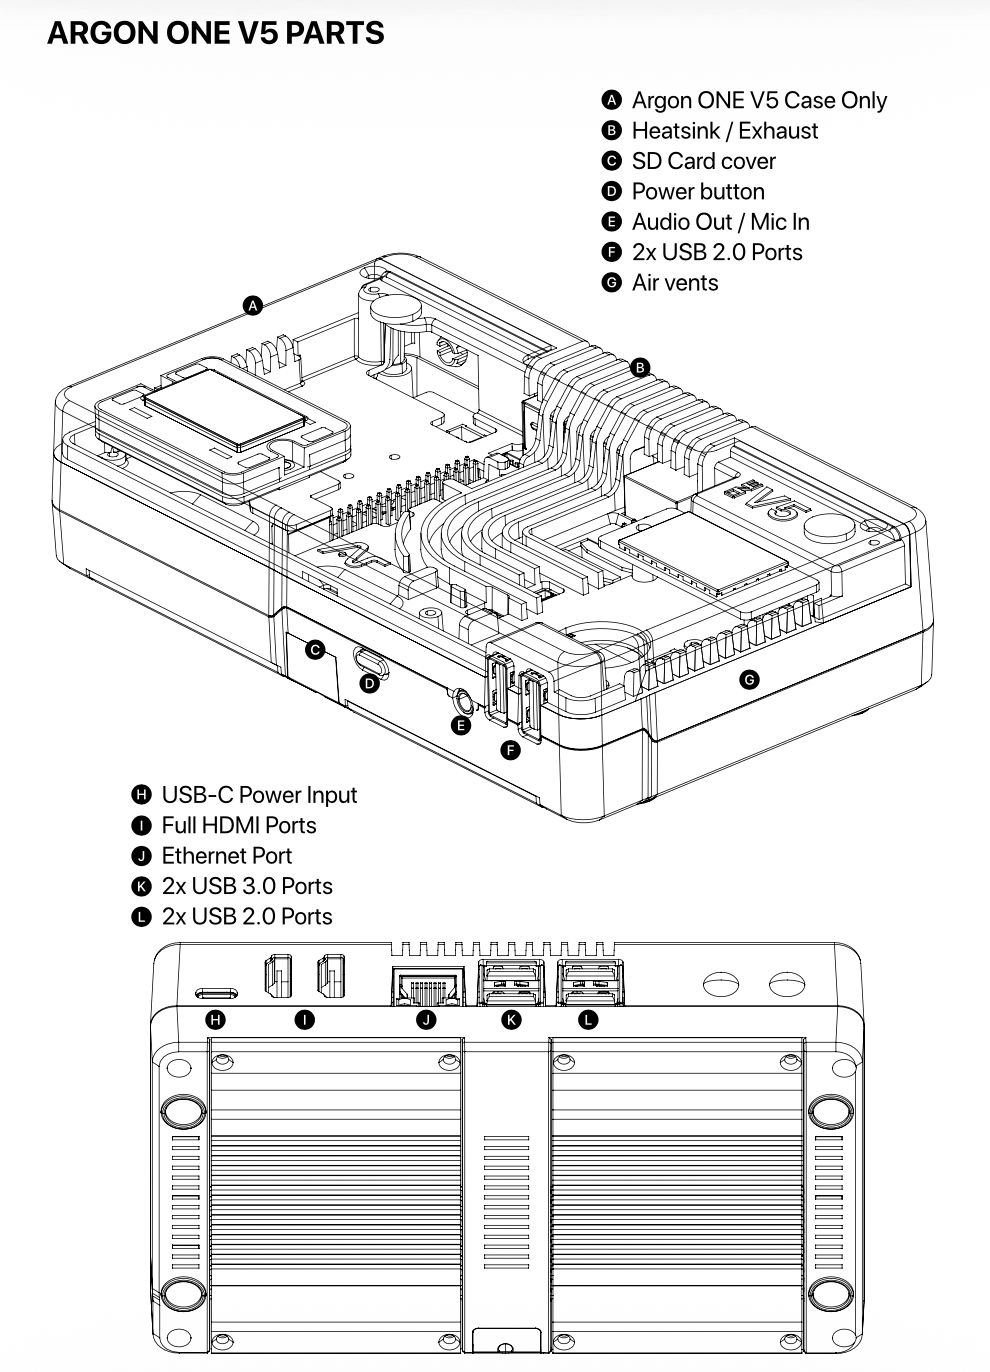

Argon ONE V5 FEATURES
¶ Assembly and Setup
|
Durable and Functional Case Material for Passive Cooling
|
Whole top of the case is Injected aluminum alloy and injected ABS plastic bottom
|
| More efficient Active Cooling | Blower type 30mm PWM actively controlled by the Raspberry Pi OS. |
| Built in DAC with MIC | Powered by HS100B - DAC Chip to provide the 3.5mm audio out and mic in functionality |
| 2 Front USB 2.0 ports |
By adding an FE1.1S - USB Hub Chip we are able to add additional 2 - USB 2.0 Ports
|
| 2 Regular HDMI | Converted the micro HDMI of the RPi 5 to Regular HDMI |
| GPIO Access | Full GPIO Access with Magnetic cover |
| UP to Quad Drive GEN 3 M.2 NVMe PCIe Drives | Options for Dual and Quad Drive M.2 NVMe SDDs through ASM2806-PCIe Gen3 Packet Switching Chip |
|
Argon ONE V5 M.2 PCIE-NVME Expansion Boards with THRML Cooling
Fits: 2230 2242 2260 2280
|
SINGLE VARIANT RPI 5 Native 1 PCIe Gen2
(1) Argon Industria NVMe-PCIe Board Module Single Drive for V5 (Board ONLY)
DUAL and QUAD PCIe GEN 2 VARIANTS Powered by ASM1182e 1 PCIe x1 Gen2 upstream port to 2 PCIe x 1 Gen2 downstream ports
(2) Argon Industria NVMe-PCIe Board Module Dual Drive for V5 (Board ONLY)
(3) Argon Industria NVMe-PCIe Board Module Quad Drive for V5 (Board ONLY)
DUAL and QUAD PCIe GEN 3 VARIANTS Powered by ASM2806 PCIe Gen3 Packet Switching Chips
(4) Argon Industria NVMe-PCIe Board Module Dual Drive Gen 3.0 for V5 (Board ONLY)
(5) Argon Industria NVMe-PCIe Board Module Quad Drive Gen 3.0 for V5 (Board ONLY)
|
| OLED Module |
Argon Industria OLED Module for ONE V5 With script displays IP address, Storage, CPU and Memory Status
|
| Zigbee Module |
Argon Industria Zigbee Module for ONE V5 CC2562P Zigbee Chip Fully compatible with Home Assistant Operating System |
ASSEMBLY INSTRUCTIONS
1. Connect the Raspberry Pi 5 to HDMI-USB2-Audio Board; and place the Silicon Thermal Pads on the CPU, RP1, PMIC, & RAM Chips
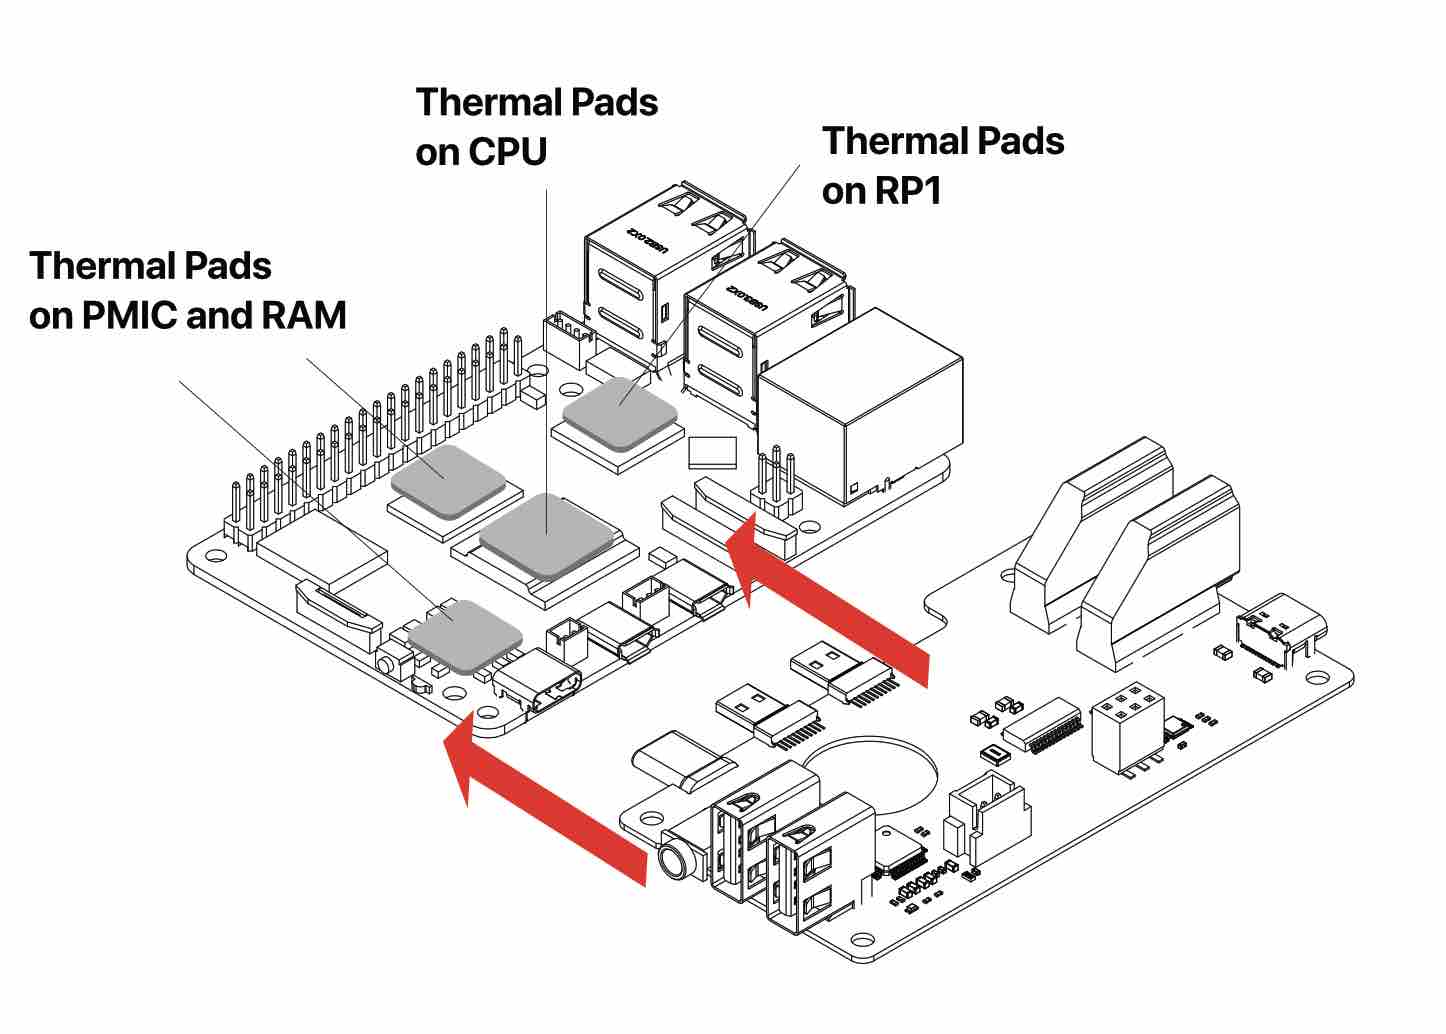
Make sure to remove the transparent backing on both sides of the thermal pads
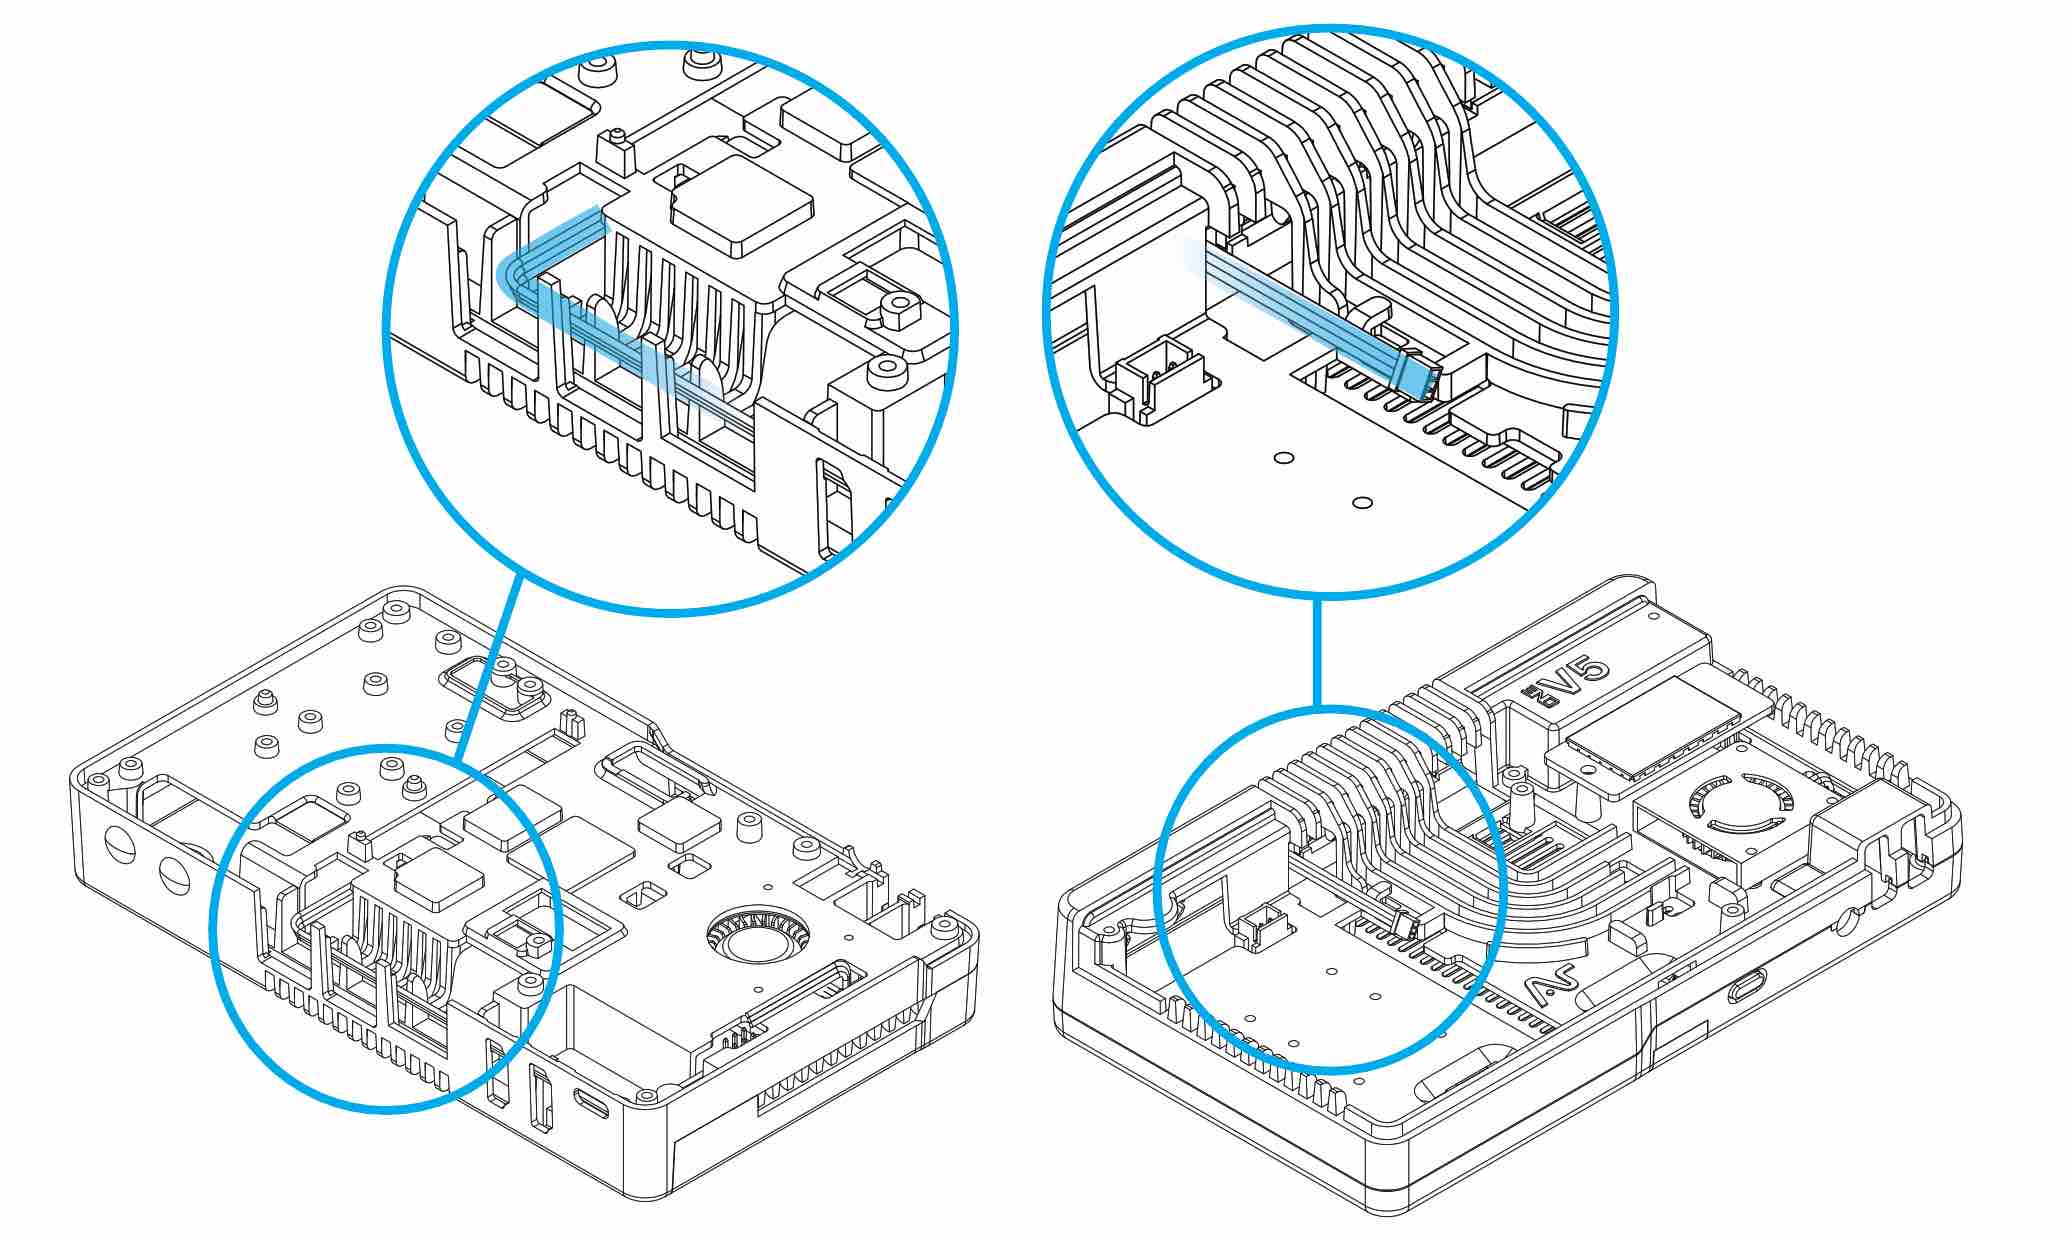
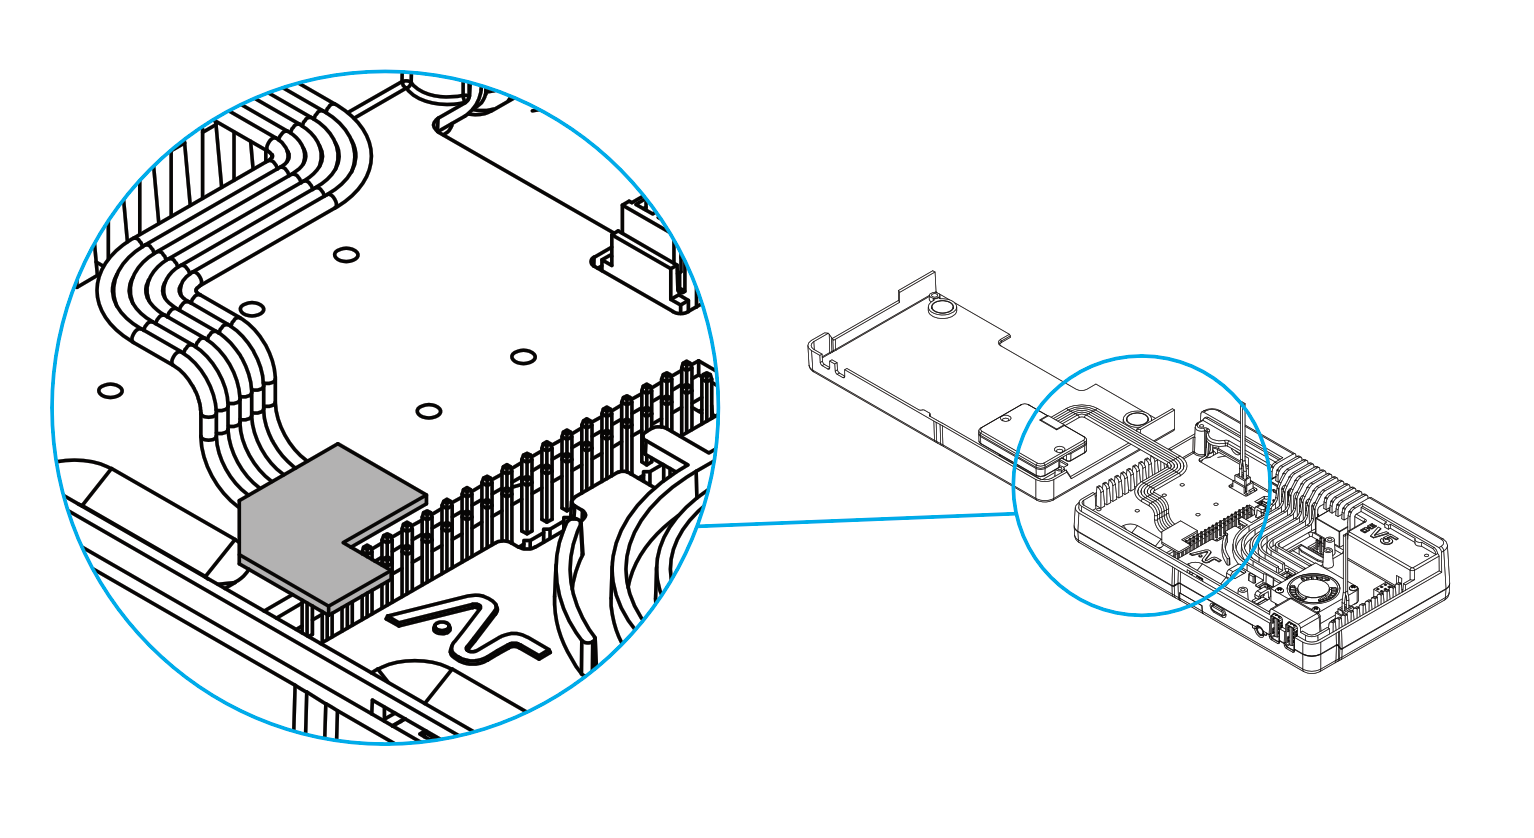
2. Route the 30mm FAN Cable and Black NVMe Power Cable through the guide post in the under side of the Argon ONE V5 Case, or on top through the built in cable management wire posts.
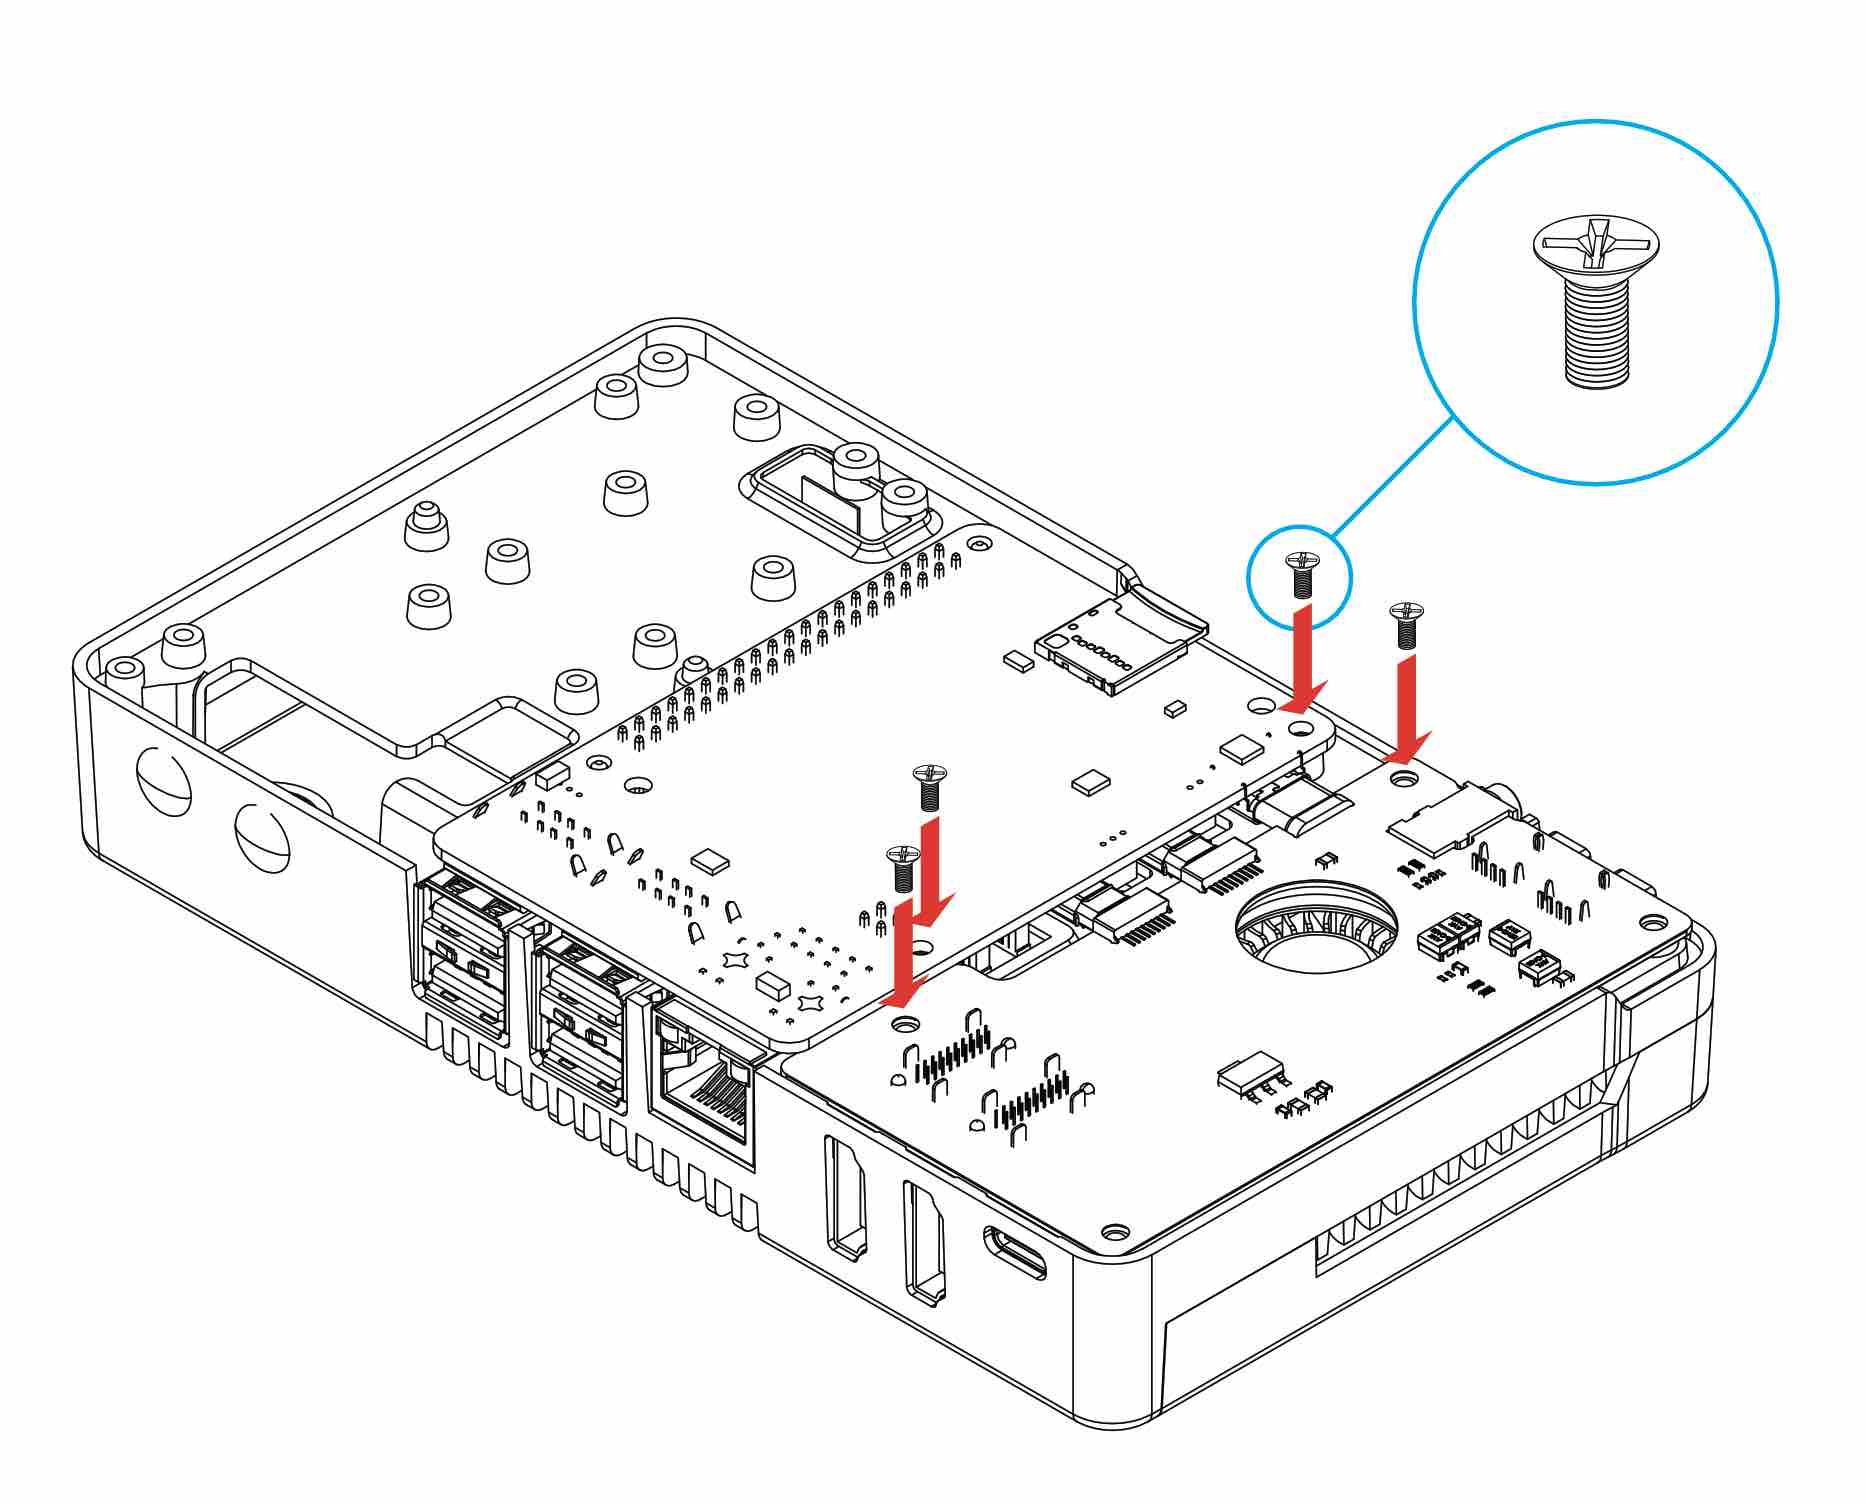
3. Place the Raspberry Pi 5 and HDMI-USB2-Audio Board assembly on the V5 Case as shown on the image below. Secure the 4 FLAT HEAD Screws.
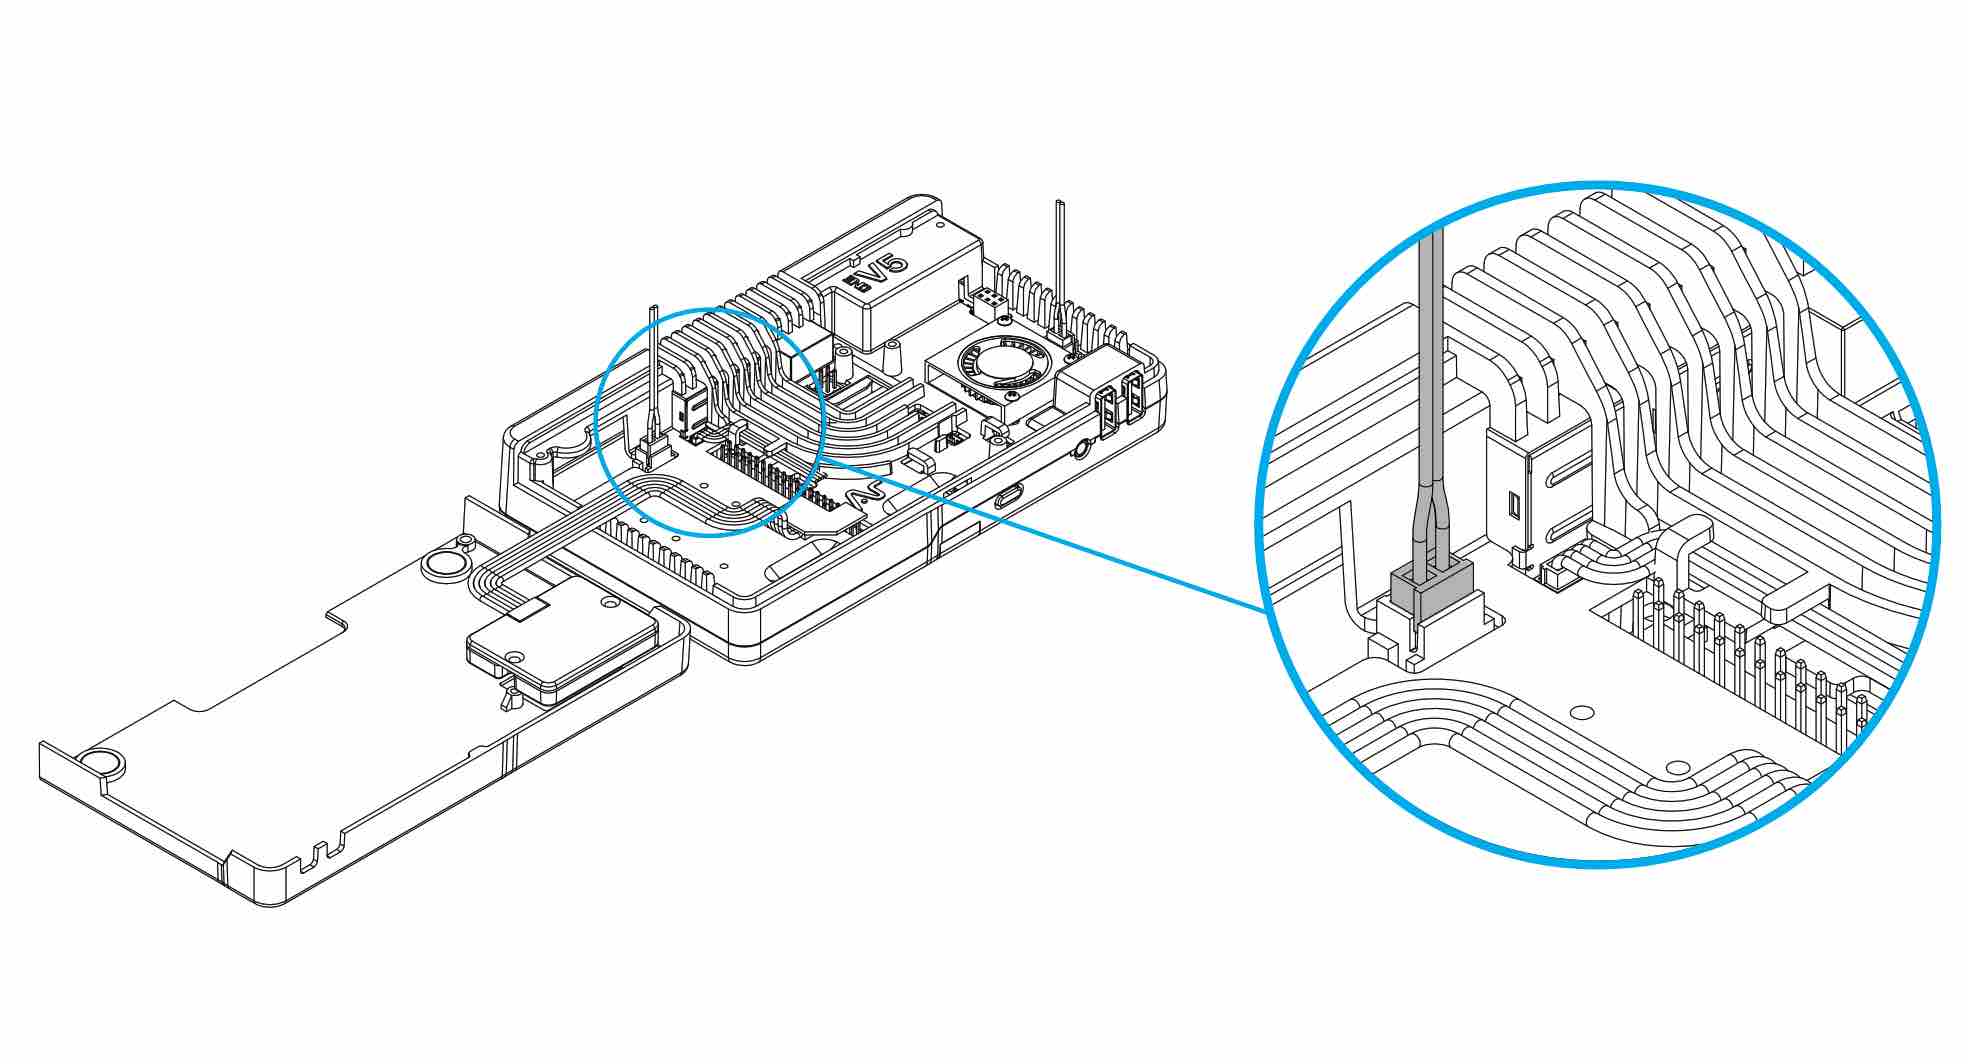
4. Connect the blower FAN cable with colored wires to the exposed Raspberry Pi 5 FAN Port.
5. Connect the Supplemental Power Supply for the NVMe Boards, (Black Wire) as shown in the image.
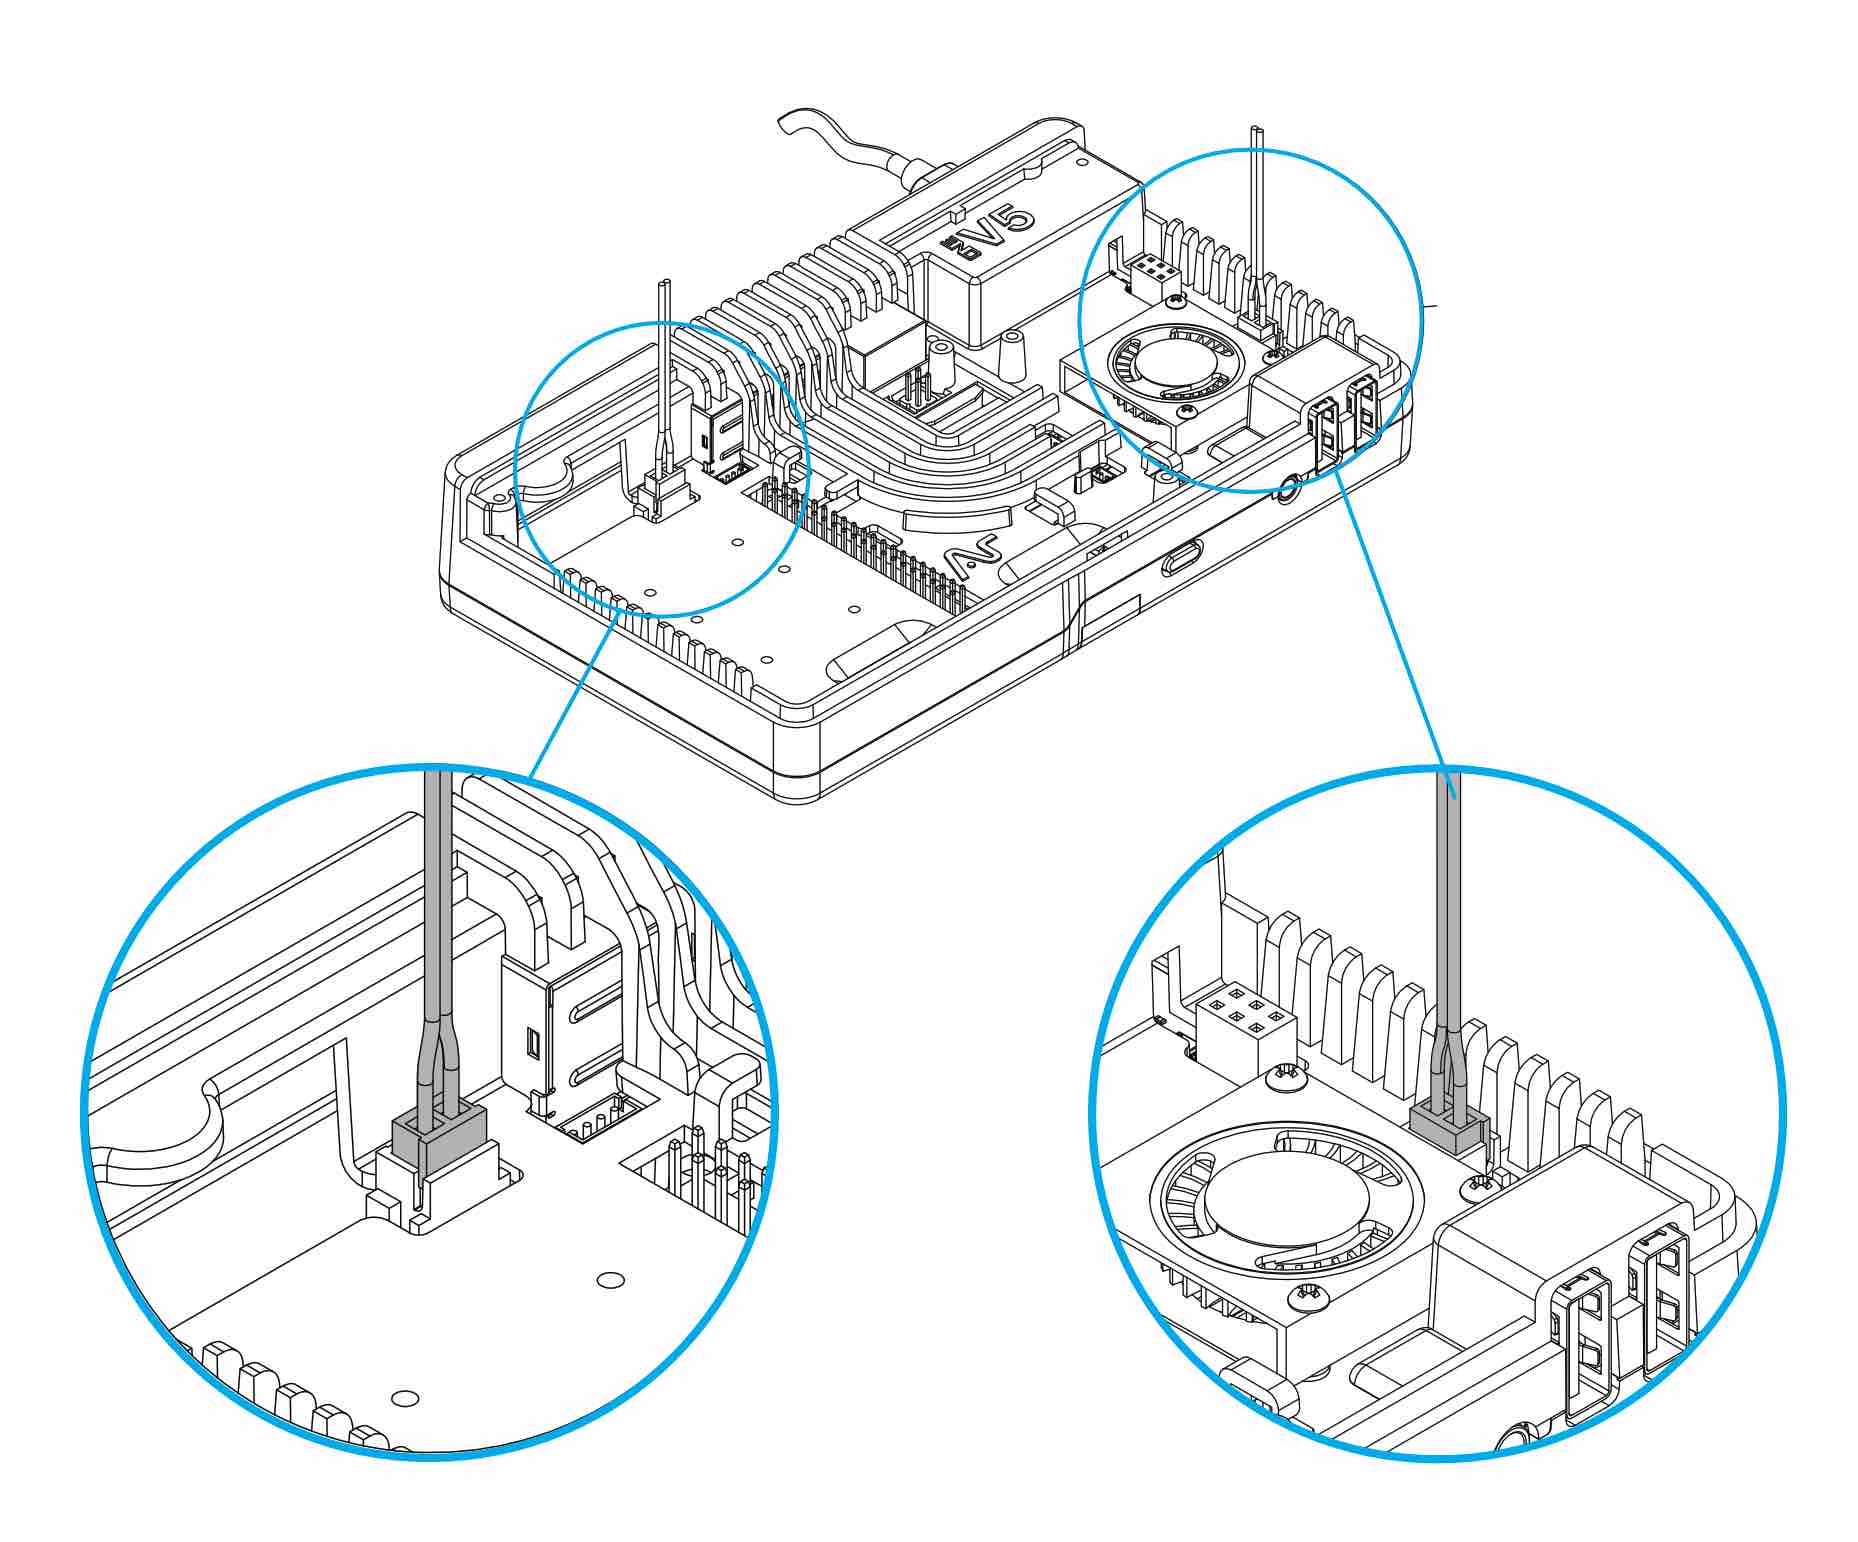
Wire can be routed inside the case. (Refer back to No. 2 for placement and location )
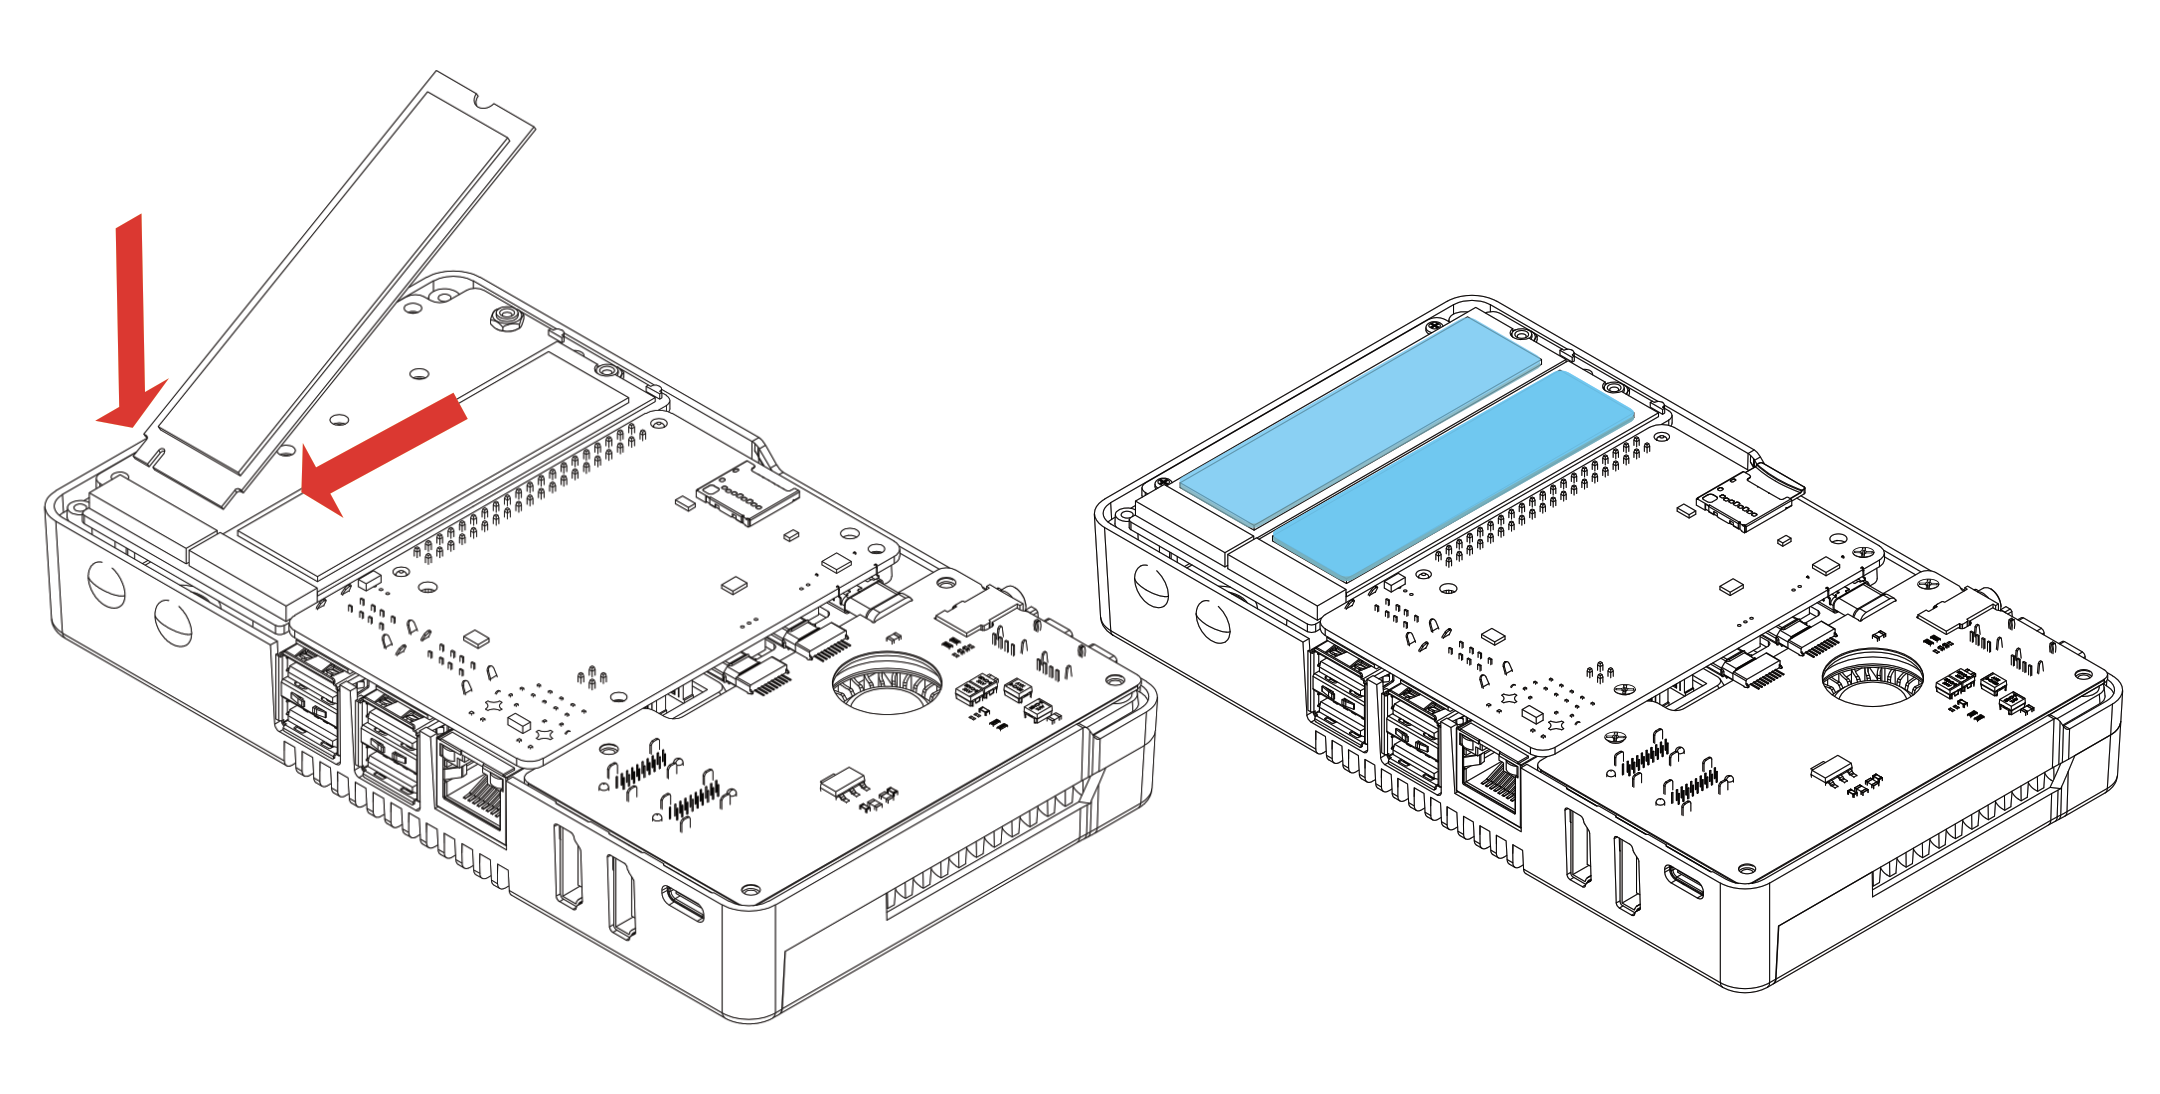
6. Install your M.2 NVMe Drives as shown in the image. Add the blue silicon thermal pads on the NVMe Drives. ( See images for the DUAL Drives and QUAD Drives for reference.)
Argon Industria QUAD NVMe PCIe Board Module
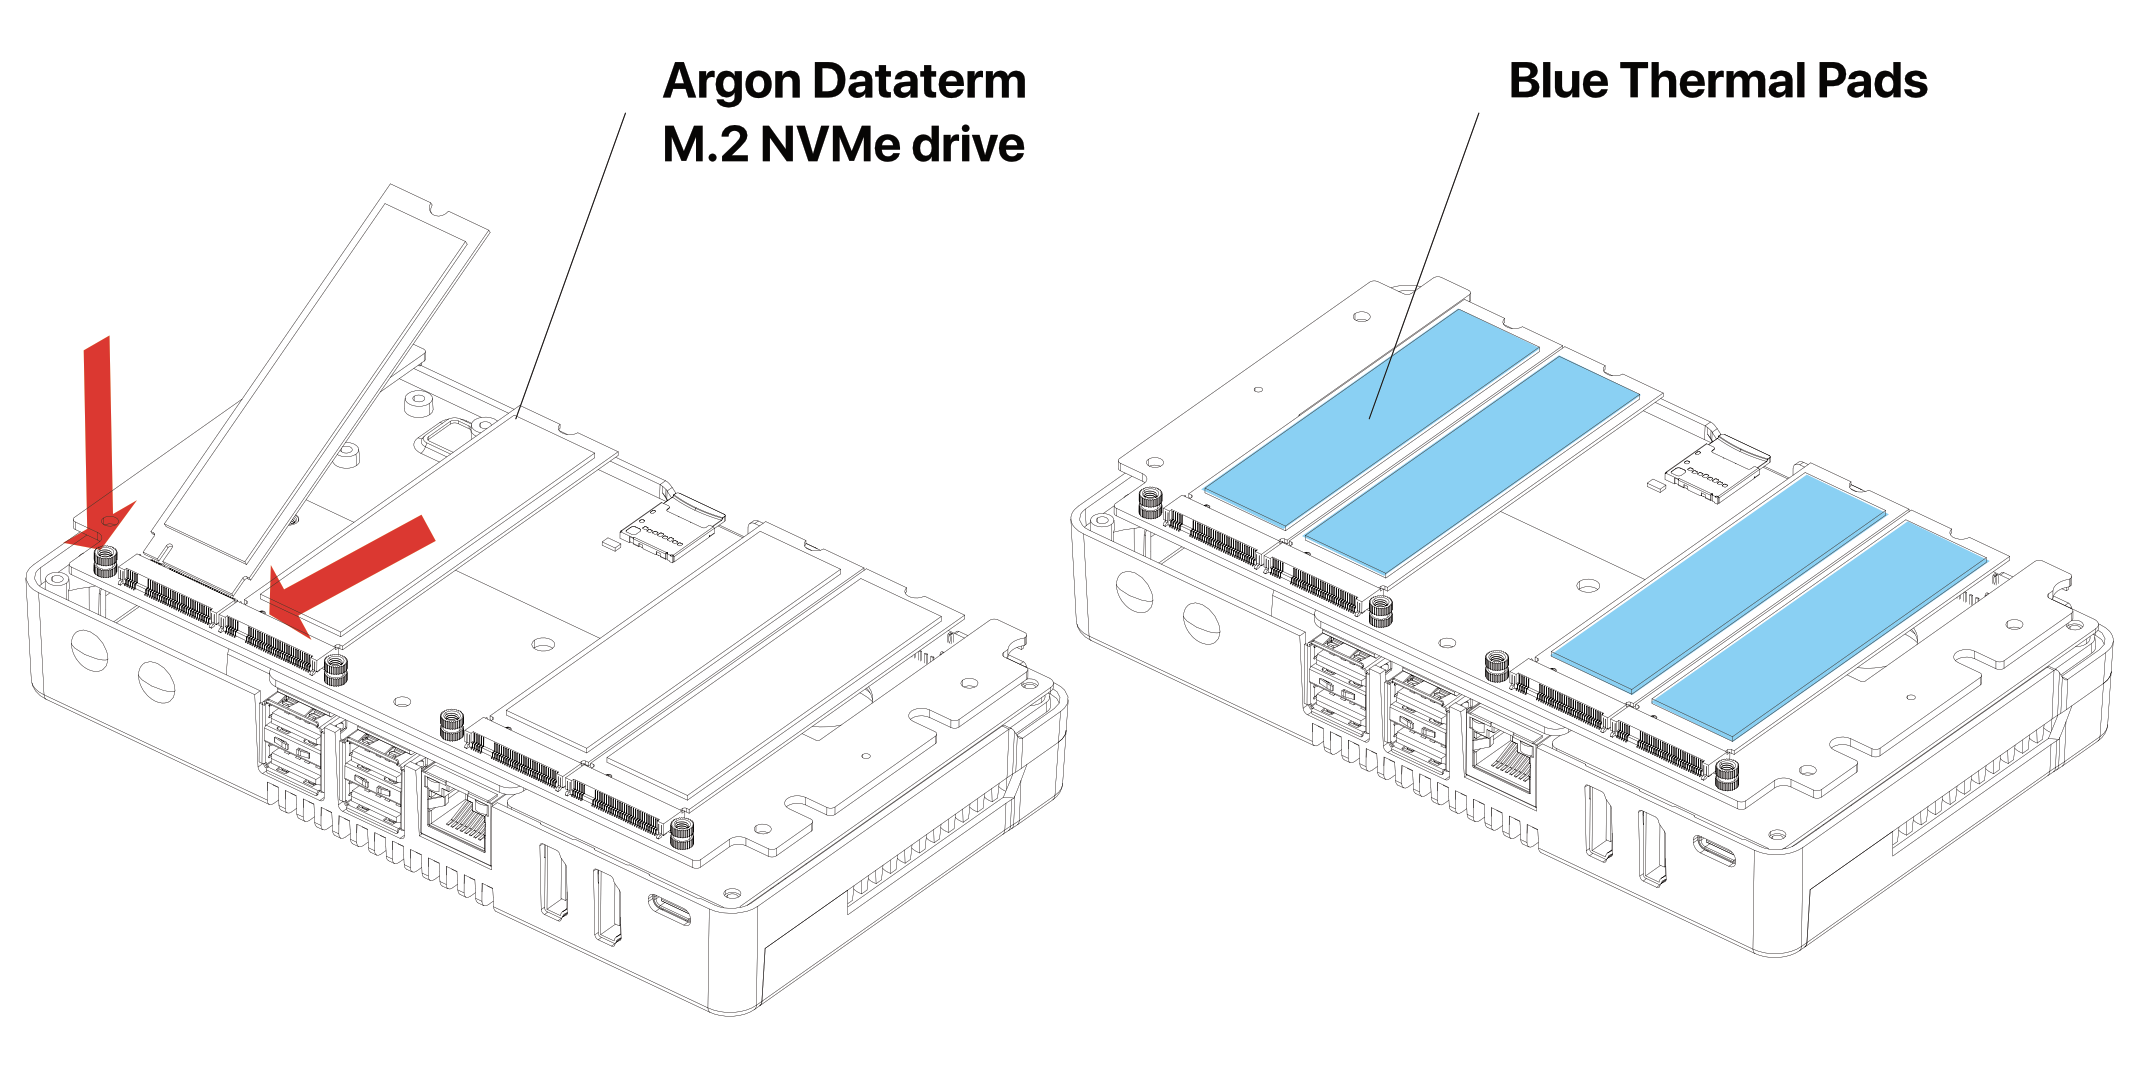
Make sure to secure SSD Drives with screws.
Argon Industria DUAL NVMe PCIe Board Module
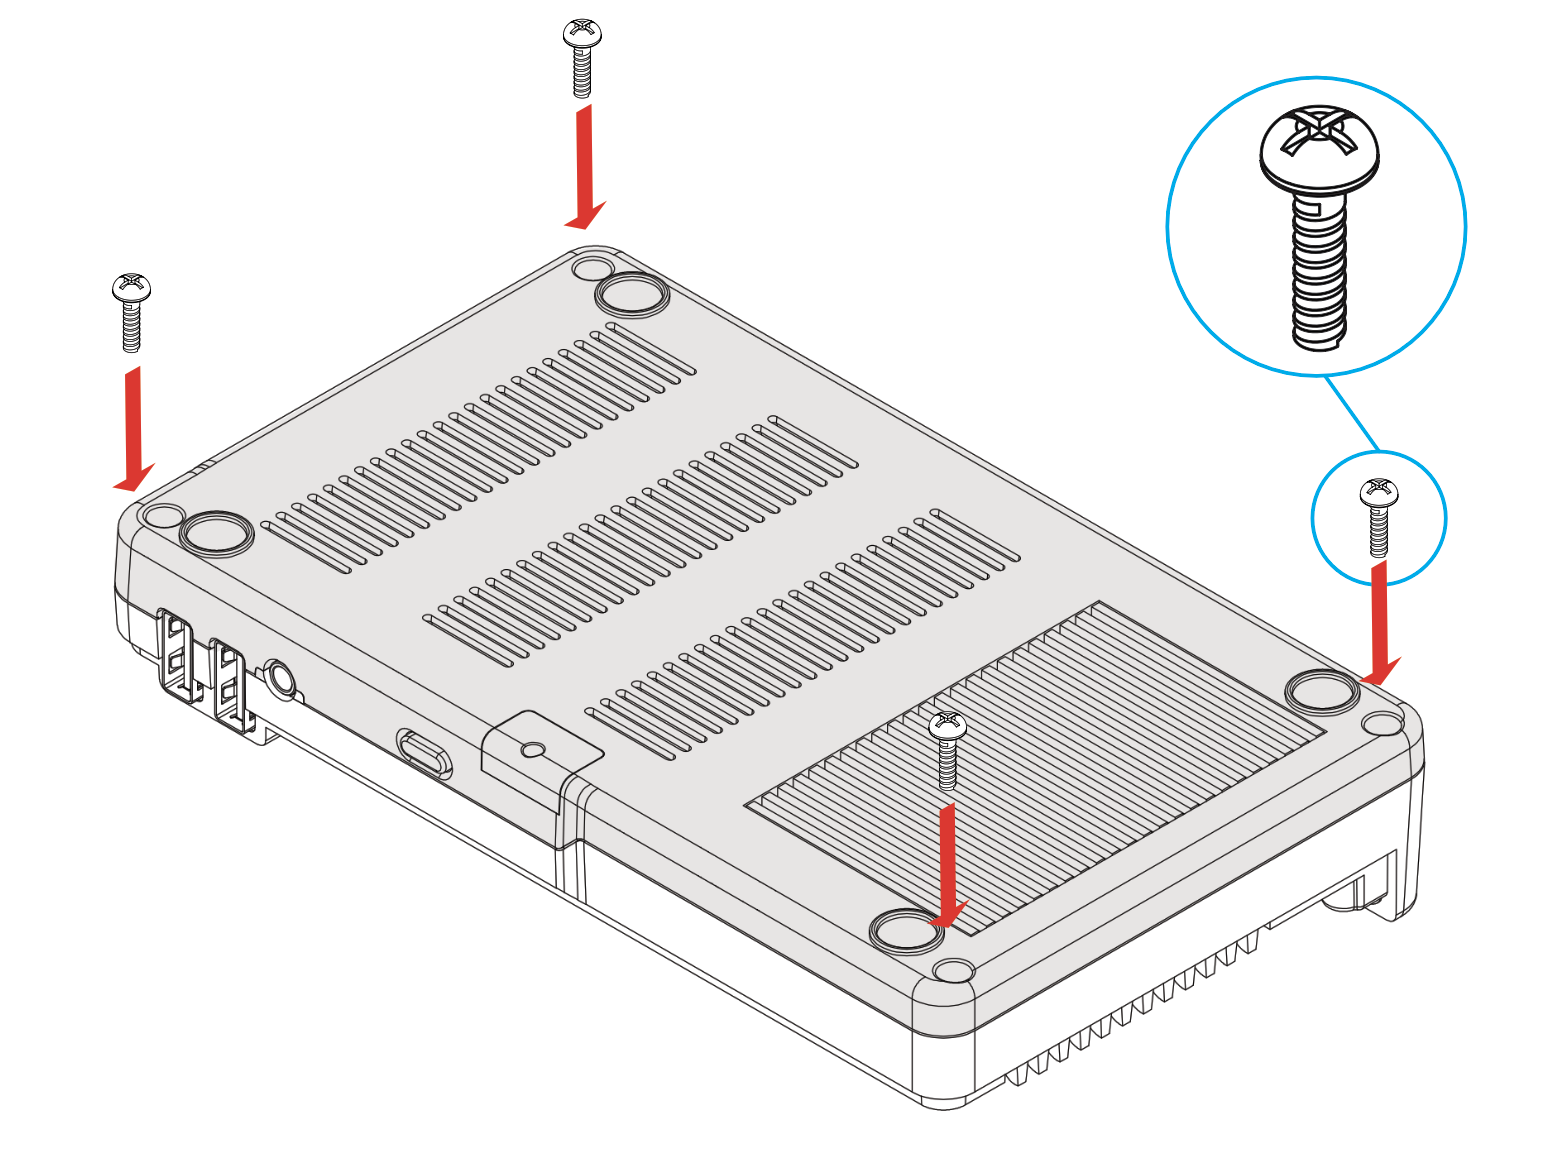
7. Secure the V5 Bottom with aluminum THRML heatsinks with 4 long ROUND screws at each corner.
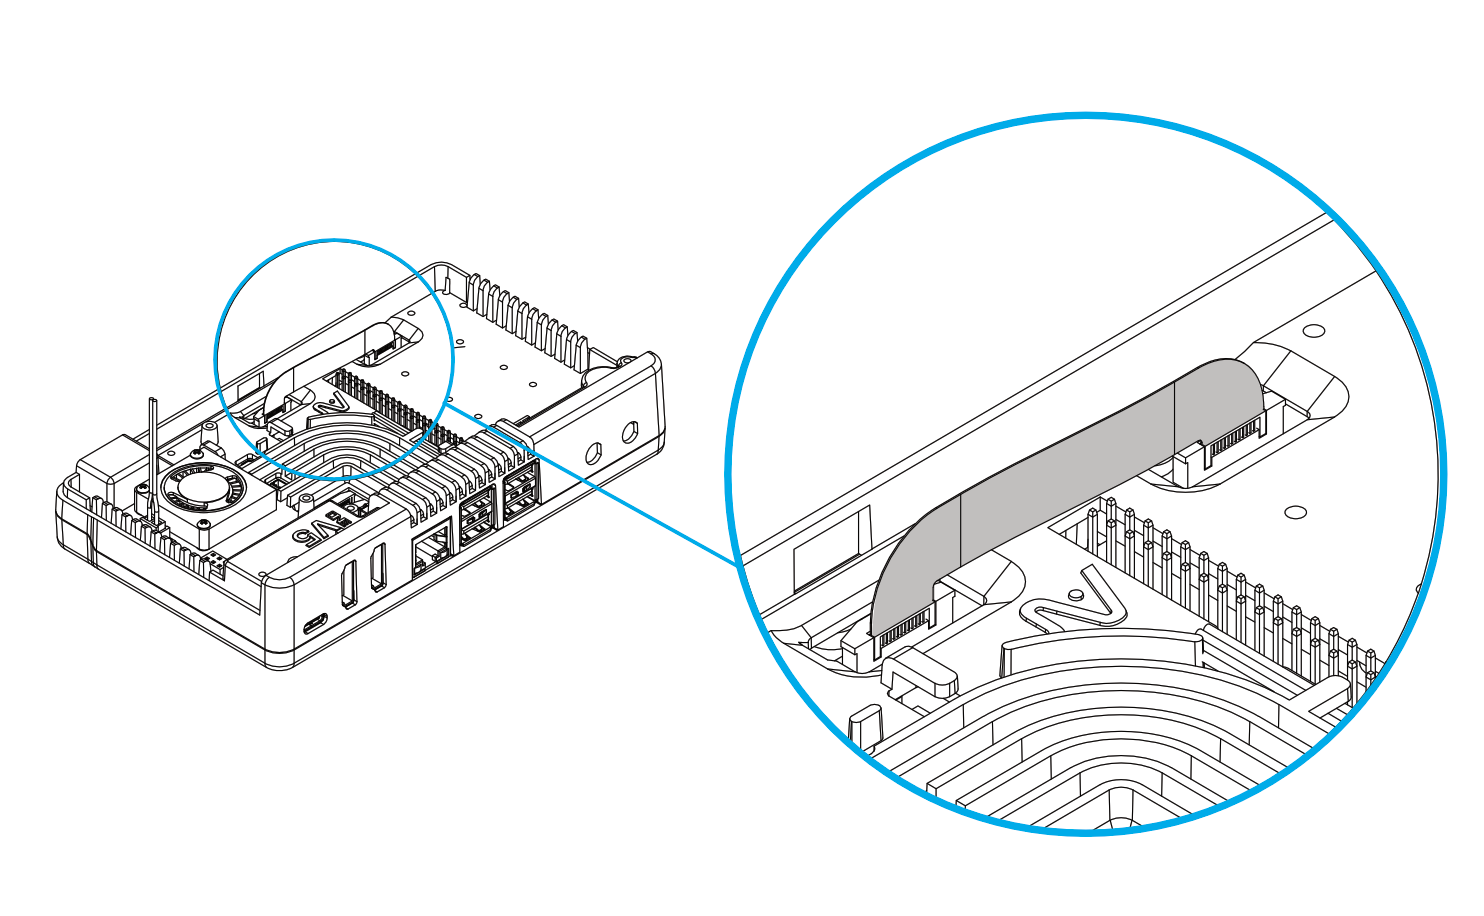
8. Connect the U-Shaped PCIe Connector to the NVMe Board and RPi 5 PCIe port. Make sure that the COPPER side is facing the White side of the PCIe terminal of the RPi 5.
9. Connect the Argon Industrial V5 OLED Module as shown in the image.
Connect the OLED module to the first 8 GPIO pins.
Make sure to remove the plastic placeholder V5 logo before installing the OLED module
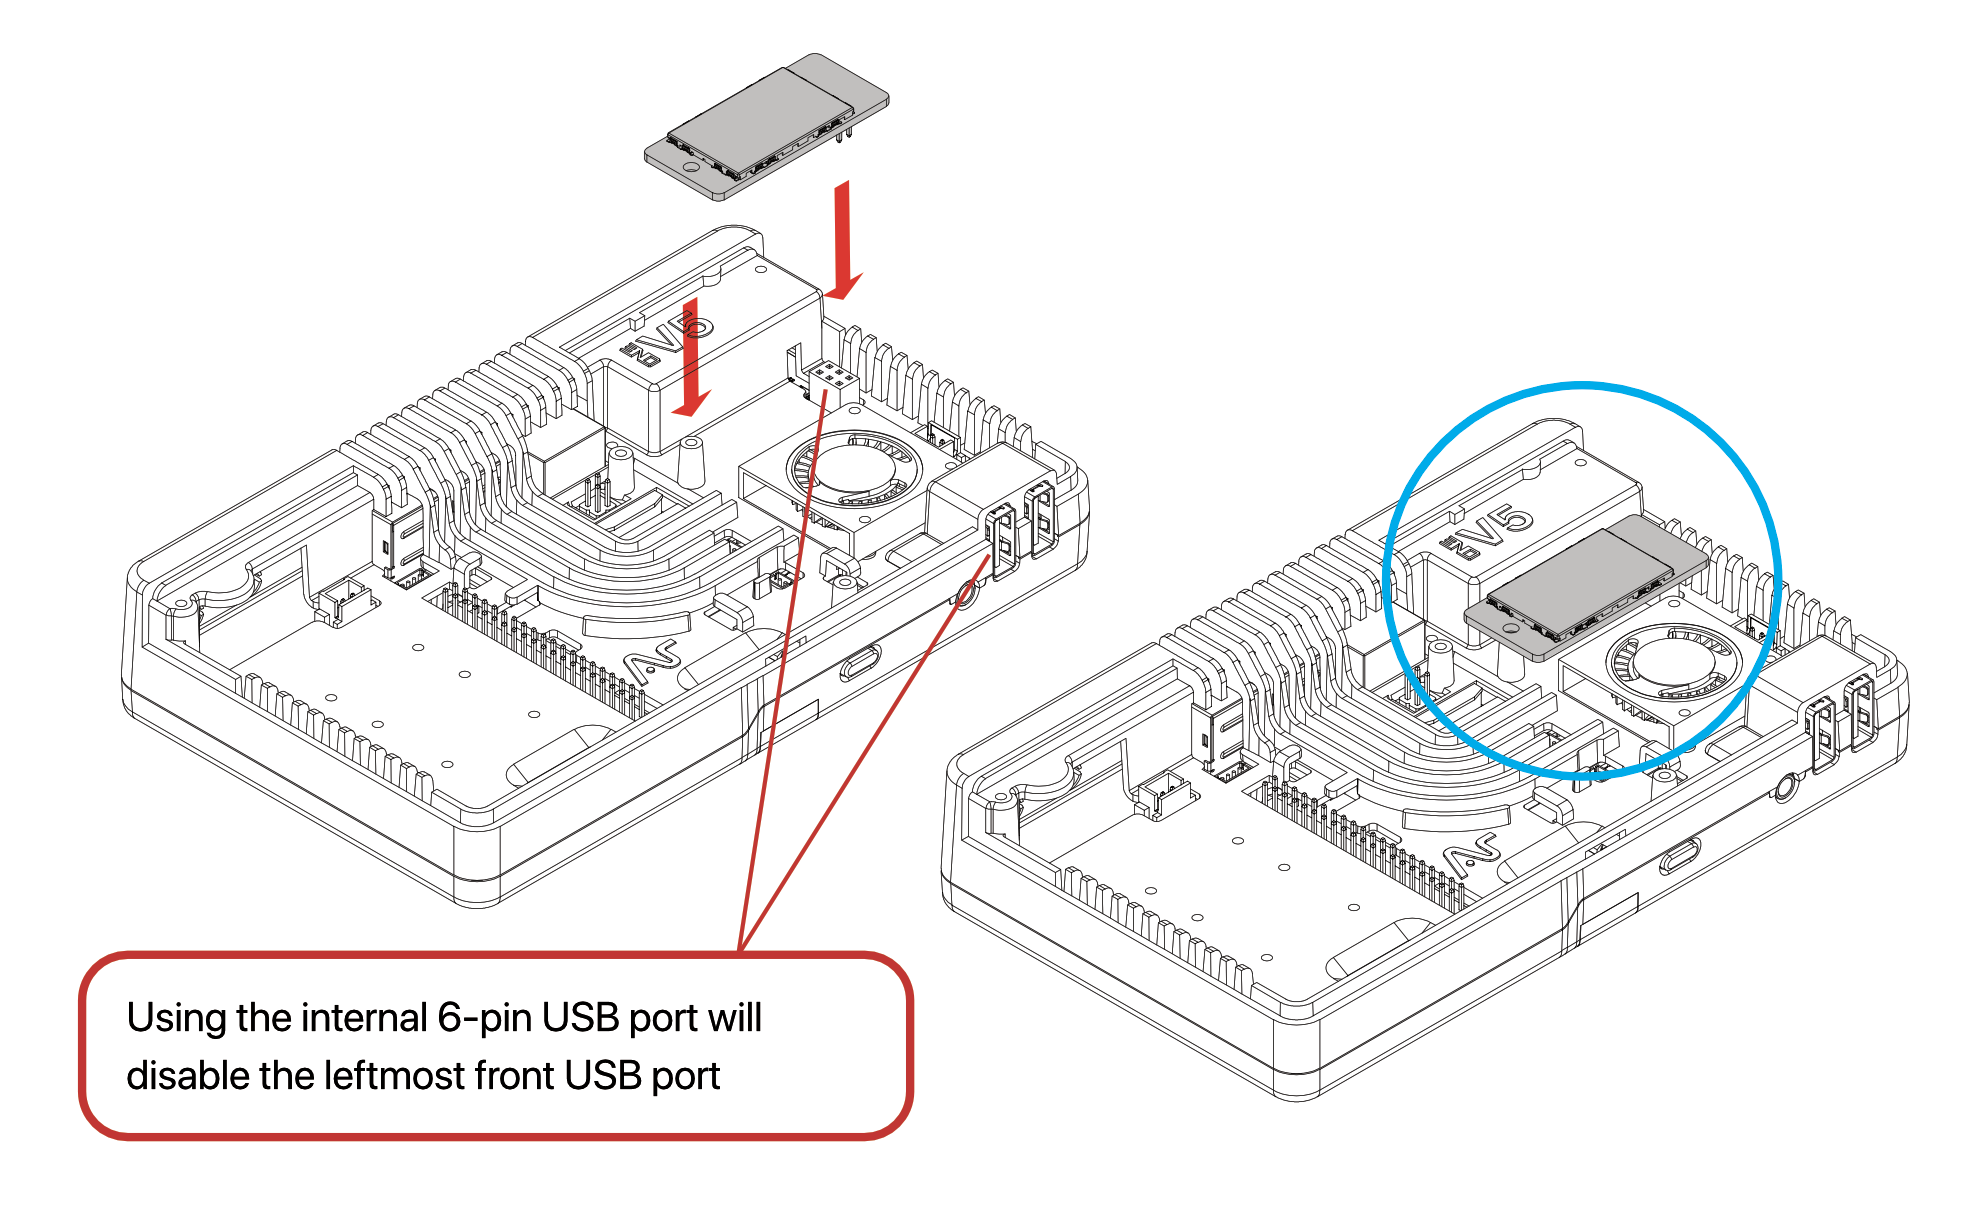
10. Connect the Argon Industrial V5 Zigbee Module as shown in the image.
¶ ENABLING THE USB PORTS AND MIC IN AND AUDIO OUT PORTS
OPTION 1: Install the Argon ONE V5 Script after you have installed your Raspberry Pi OS. Follow the Instructions in the next Section.
OPTION 2: Edit the /boot/firmware/config.txt file by adding the line:
dtoverlay=dwc2,dr_mode=host