¶ Argon ONE V5 Resource Page
¶ Argon ONE V5 Kit Contents (Parts List)
This list details all the components included in the Argon ONE V5 kit:
Case Components:
- Argon ONE V5 Top case
- ABS OLED cover
- Argon ONE V5 Middle case
- Argon ONE V5 Bottom case
- Silicone cover (for the power button)
Electronics & Accessories: 6. U-shaped PCIe Connector 7. PWM 30mm Fan 8. Argon ONE V5 HDMI-Audio Board 9. Argon THRML M.2 NVMe heatsink
Fasteners: 10. 8 pcs Flat head $2.5 \times 6$ screws 11. 4 pcs Round head $2.5 \times 8$ screws
(Note: Raspberry Pi 5 board and SD Card are not included.)
¶ Parts and Features
¶ Argon ONE V5
| Feature | Description |
|---|---|
| Case Material | Injected aluminum alloy (top) and injected ABS plastic (bottom) for passive cooling. |
| Active Cooling | Blower type 30mm PWM fan, actively controlled by the Raspberry Pi OS. |
| Audio | Built-in DAC (HS100B chip) providing 3.5mm audio out and mic in functionality. |
| Front Ports | 2 Front USB 2.0 ports (via FE1.1S - USB Hub Chip). |
| Video Output | Converts the Raspberry Pi 5's micro HDMI ports to 2 Regular HDMI ports. |
| GPIO Access | Full GPIO access with a magnetic cover. |
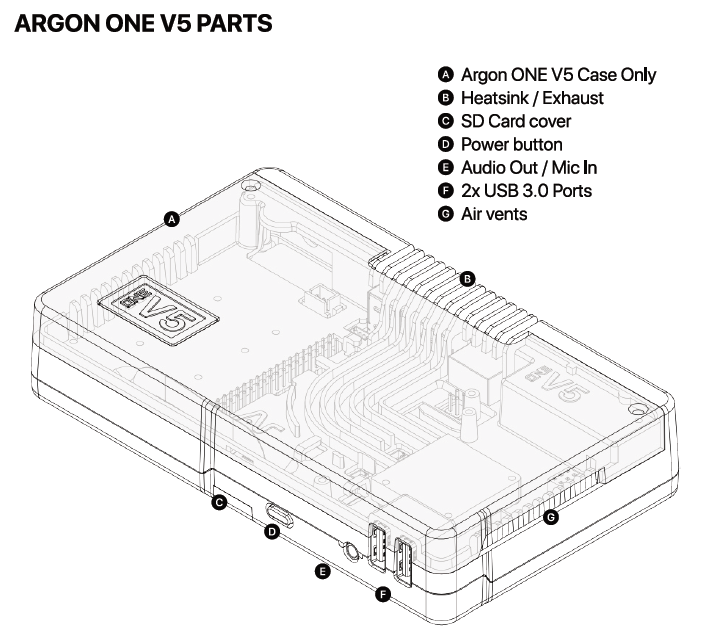
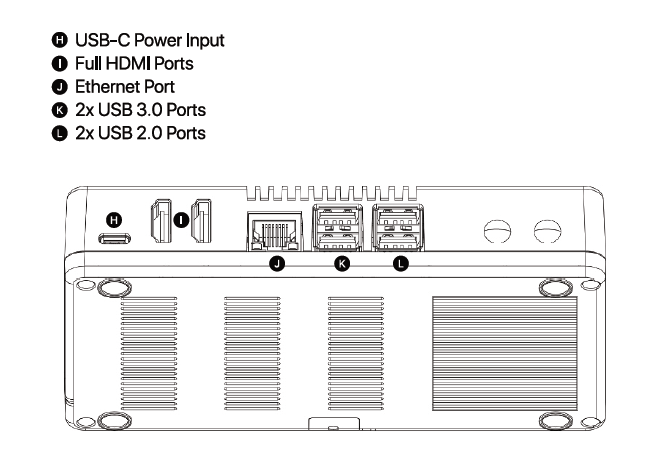
¶ Ports and Components
| Label | Component |
|---|---|
| Front | |
| A | Argon ONE V5 Case Only |
| C | SD Card cover |
| D | Power button |
| E | Audio Out / Mic In |
| F | 2x USB 3.0 Ports |
| G | Air vents |
| Rear | |
| H | USB-C Power Input |
| I | Full HDMI Ports |
| J | Ethernet Port |
| K | 2x USB 3.0 Ports |
| L | 2x USB 2.0 Ports |
| B | Heatsink / Exhaust |
¶ Assembly & Setup
¶ Assembly Instructions
¶ Step 1: Prep the Raspberry Pi 5 Board
Connect the Raspberry Pi 5 board to the Argon ONE V5 HDMI-Audio Board.
Place the Silicon Thermal Pads on the CPU, RP1, PMIC, and RAM chips of the Raspberry Pi 5 board.
CRITICAL: Make sure to remove the transparent backing on both sides of the thermal pads before placement.
It's recommended to reseat the HDMI daughter board and Pi board connections two or three times due to tight tolerances. Ensure you push them all the way in for a proper connection.
The tight tolerances in the design are intentional due to the use of a Power Delivery (PD) power supply. Unlike regular non-PD adapters that immediately provide 5V upon connection, a PD power supply waits for a proper signal from the Raspberry Pi board to negotiate and deliver the correct voltage. If there’s a loose connection, the PD power supply may not receive that signal, resulting in no power being delivered
The same principle applies to the USB-C and HDMI connections on the daughterboard. Both carry complex signals, and even slight looseness can lead to issues — whether it's the PD negotiation for power or signal integrity for video output. This is why a secure and properly aligned fit is critical for stable operation.


Please push the connection in all the way, as shown in the photo. A loose connection will prevent the PD handshake from being established, which is required for the device to power on.
¶ Step 2: Route Cables
Route the PWM 30mm Fan cable and the NVMe Power cable through the guide posts located at the rear of the Argon ONE V5 middle case.
¶ Step 3: Install Board Assembly
Place the combined Raspberry Pi 5 and HDMI-USB2-Audio Board assembly onto the V5 middle case.
Secure the assembly using 4 FLAT HEAD Screws (2.5x6) as indicated in the manual's diagrams.
¶ Step 4: Optional M.2 NVMe Installation
(Only follow this step if you are using M.2 Expansion Boards and an NVMe Drive)
Install your M.2 NVMe Drive (e.g., Argon Dataterm M.2 NVMe drive) into the M.2 Expansion Board.
Place the Blue Thermal Pads on top of the installed NVMe Drives.
Connect the U-Shaped PCIe Connector between the NVMe Board and the Raspberry Pi 5 PCIe port.
CRITICAL: Ensure the COPPER side of the connector is facing the WHITE side of the clips on the Raspberry Pi 5.
¶ Step 5: Final Case Assembly
Secure the V5 Bottom case (with aluminum THRML heatsinks) to the main assembly using the 4 long ROUND screws (2.5x8) at each corner.
Connect the blower FAN cable (the one with colored wires) to the exposed Raspberry Pi 5 FAN Port.
Connect the Supplemental Power Supply for the NVMe Boards (Black Wire) to the appropriate header. (The wire can be routed inside the case, referring to the cable routing done in Step 2.)
¶ Step 6: Optional Module Installation
OLED Module: Connect the Argon Industrial V5 OLED Module to the first 8 GPIO pins.
CRITICAL: Make sure to remove the plastic placeholder V5 logo before installing the OLED module.
ZigBEE Module: Connect the Argon Industrial V5 ZigBEE Module as shown in the diagrams.
¶ Enable Front Ports
¶ USB, Mic In, and Audio Out
To enable the full functionality of the front USB ports, Mic In, and Audio Out ports, use one of the two options below after installing your Raspberry Pi OS:
¶ Option 1: Install Argon ONE V5 Script (Recommended)
Connect to the Internet and execute the following command in the Terminal:
curl https://download.argon40.com/argon1v5.sh | bash
Reboot the system.
Follow the instructions in the Argon Configuration Tool to adjust settings and enable full case functionality.
¶ Option 2: Manual Configuration Edit
Edit the /boot/firmware/config.txt file in the Command Terminal.
You will need with superuser privileges to edit the file.
sudo nano /boot/firmware/config.txt
Add the following line to the file at the end of the text file:
dtoverlay=dwc2,dr_mode=host
¶ Argon ONE V5 Add-Ons
| Add-On | Description | Options |
|---|---|---|
| M.2 NVMe-PCIe Expansion Boards | Allows installation of NVMe drives with THRML cooling. | Argon ONE V5 SINGLE M.2 NVMe PCIe Expansion Board, Argon ONE V5 DUAL M.2 NVMe PCIe Expansion Board |
| Argon Industria V5 OLED Module | 1.8 inch OLED Module. | N/A |
| Argon Industria V5 ZigBEE Module | CC2562P Zigbee Chip for Home Assistant integration. | N/A |
| Argon Dataterm M.2 NVMe Drive | M.2 NVMe drive (optional purchase). | N/A |
¶ Batocera Installation
To enable the front USB ports and the Audio Jack follow the link below: